Back

knowledge base

Recipients

Recipients Imports

Workbloom supports importing recipient data through a connected HR integration. When a supported HR system is selected as the data source, recipient information can be synchronized directly into Workbloom without manually uploading files.

Currently, recipient data can be imported through a connected PeopleXD integration. See how to connect PeopleXD with Workbloom.

Step-by-Step Instructions

  • Import Recipients from PeopleXD

  1. Sign in to your Workbloom account.  
  1. Navigate to Recipients.  
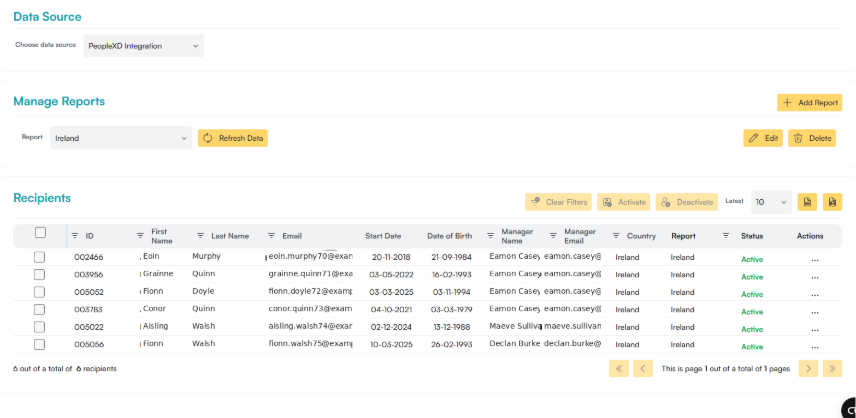
  1. Under Data Source, select PeopleXD Integration.  
  1. Select the appropriate report, if applicable.  
  1. Click Refresh Data.  
Data Source section with a red arrow pointing to the Choose data source dropdown set to PeopleXD Integration, and Manage Reports section with a red arrow pointing to the Refresh Data button next to the Ireland report

  1. Wait for the synchronization process to complete.  
  1. Review the imported recipients in the recipient list.  

Recipients table showing imported recipient

Imported recipients become available for campaign selection and reward distribution after the synchronization process has completed successfully.

Tips

  • Ensure the PeopleXD integration has been configured correctly before refreshing data.
  • Verify that recipient records exist in the selected PeopleXD report.
  • Refresh recipient data regularly to keep employee information up to date.
  • Review imported records after each synchronization.

Common Mistakes

  • Selecting the wrong data source.
  • Attempting to refresh data before the integration has been configured.
  • Using an outdated or empty PeopleXD report.

Related Articles

This guide has been created to help you seamlessly generate an Insight Web Service Report from PeopleXD and use the extracted data within Workbloom.  
Step-by-Step Instructions

  • Create the Insight Web Service Report

  1. Go to Insight → Web Services → Create Web Service.
  1. Build a report that includes the following fields:  
  • Employee name  
  • Work email  
  • Start date  
  • Birth date  
  • Reporting manager  
  • Manager email
  1. Apply filters so the report returns only current employees for a specific company, location, etc.  

  • Test the Report

  1. Run the report to confirm:
  • Fields are correct
  • Employee list is accurate
  • No restricted views are used

Note: When run in Portal, the report can only return a max of 250 rows. This is for testing purposes. When run as an API, a max of 250k rows can be returned.
  • Generate the API Endpoint

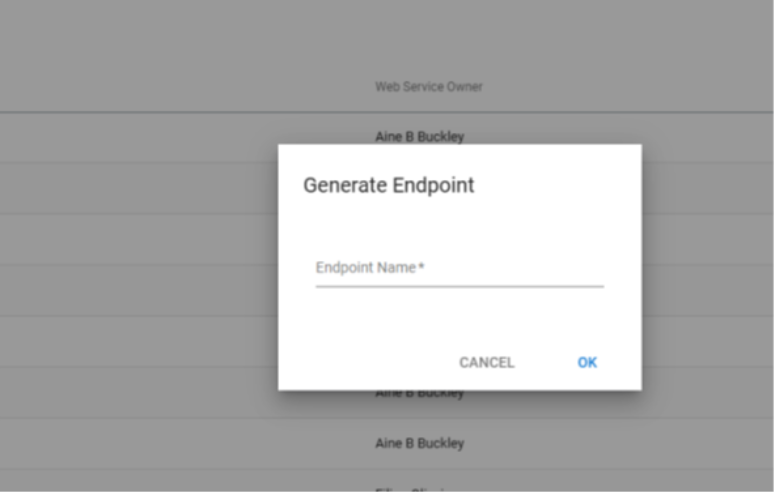
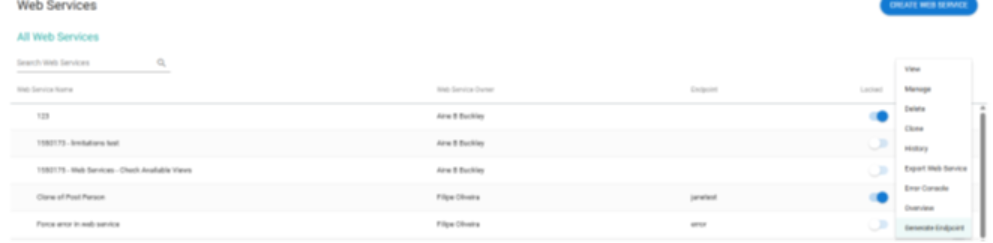
  1. From the "…" menu on the right side of the report, select Generate Endpoint.

        2. Provide the Endpoint Name to us.  

  • Provide API Credentials

  1. Go to Security → Web Service Apps → XD-Evo-Insight  and share the following:  
  • Tenant  
  • Client ID  
  • Client Secret  
  • Insight Endpoint Name

This is the information you should see.  

Application Name: **********

Application ID: **********

Application Secret: **********  

  • Ensure CI User Access:  

  1. Confirm the CI User has access to:  
  • All data views used in the report  
  • All employees included in the report

  • Enable Additional Views (if needed):

  1. In Insight Configuration → Views, toggle WS Active for any required additional views.

  • Maintain the Report:  

  1. Keep the report updated when new organisational units or employee structures are added.
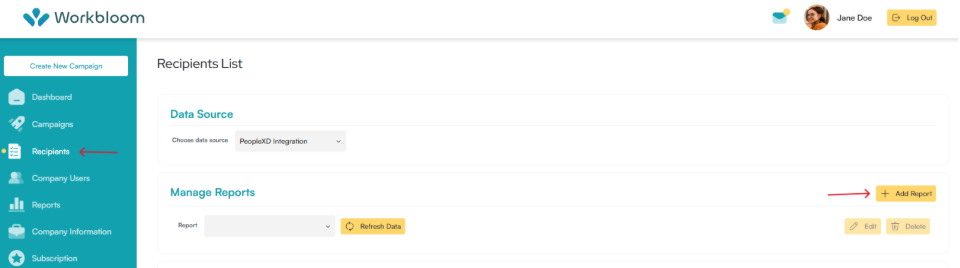
  • Add the Report on Workbloom

  1. Once you have completed the previous steps, you need to provide the following information to Workbloom:
  • Report Name – Add a unique name for your report. This will help you when multiple reports are uploaded within the platform.  
  • Insight Endpoint Name - Insight Endpoint Name from the report details
  • Client Secret - Application Secret from the report details
  • Tenant - Tenant from the report details (use lowercase letters)
  • Client ID - Application ID from the report details
  • Country - Add a country the report is for (e.g., All employees are located and working in Ireland). If employees are located in multiple countries, you need to generate a separate report for each country.

Recipients List page with a red arrow pointing to Recipients in the sidebar, and a red arrow pointing to the Add Report button next to the Manage Reports section

            2. Select Validate to check if all details are populated correctly.  
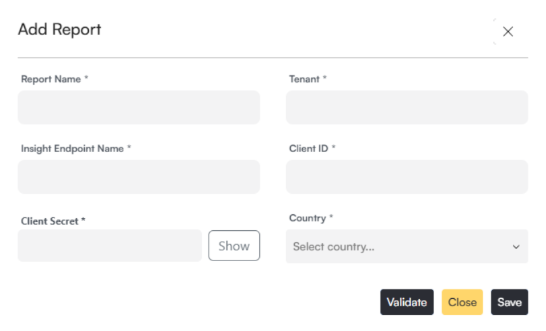
Add Report dialog window with Validate, Close and Save buttons below the fields

           3. Once done select Save and wait until the details are updated within the Recipients menu. A notification will appear in the notification bar.

Related Articles

Workbloom allows administrators to upload recipient information manually using an Excel template. This option is useful when an HR integration is not available or when recipient records need to be added manually.
Step-by-Step Instructions

  • Upload Recipients Using Excel

  1. Sign in to your Workbloom account.  
  1. Navigate to Recipients.  
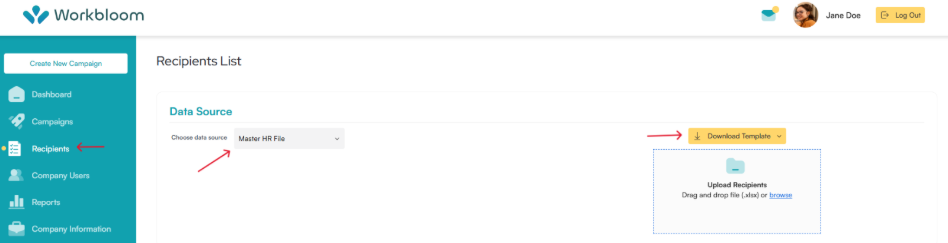
  1. Under Data Source, select Master HR File.  
  1. Click Download Template.  

Recipients List page with red arrows pointing to Recipients in the sidebar, the Choose data source dropdown set to Master HR File, and the Download Template button

  1. Complete the template with recipient information.  

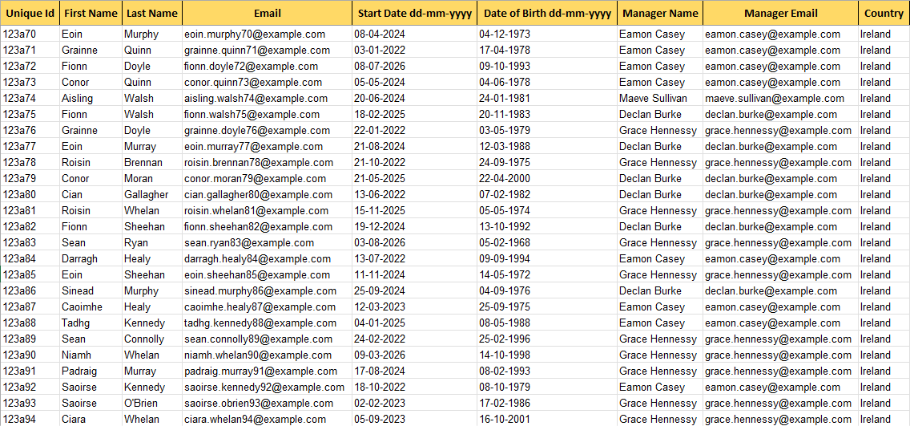
Example:

Excel template example with columns for Unique ID, First Name, Last Name, Email, Start Date, Date of Birth, Manager Name, Manager Email, and Country, populated with sample recipient data

  1. Save the file in .xlsx format.  
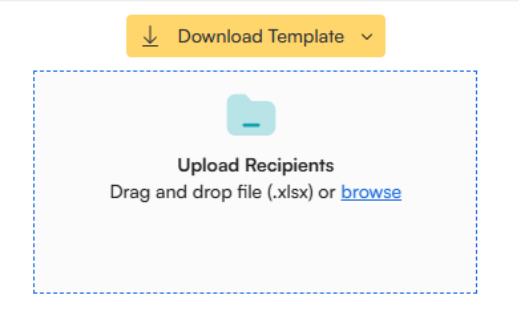
  1. Drag and drop the file into the upload area or select Browse.  
Upload Recipients area to drag and drop or browse for an .xlsx file

  1. Wait for the upload process to complete.  
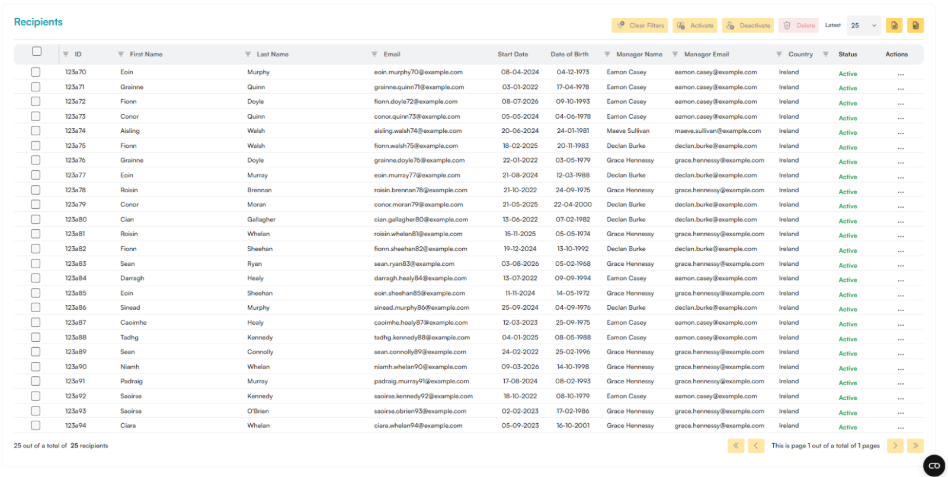
  1. Review the imported recipients in the recipient list.  
Recipients table showing 25 imported recipients

  • Recipients' File Format Requirements  

Recipient import files must follow the required structure to ensure successful processing. Using the correct format helps prevent validation errors and import failures.

  • Supported File Format

Microsoft Excel (.xlsx)  

  • Recipient Information May Include

Unique ID  

First Name  

Last Name  

Email Address  

Start Date  

Date of Birth  

Manager Name  

Manager Email  

Country

Tips

  • Always use the latest template downloaded from Workbloom.
  • Verify email addresses before uploading recipients.
  • Ensure all required fields are completed.
  • Use consistent formatting throughout the file.  
  • Review imported records after the upload has finished.

Common Mistakes

  • Uploading files in an unsupported format.
  • Editing or removing template column headers.
  • Using invalid email addresses.
  • Uploading duplicate recipient records.
  • Leaving required fields blank.

Related Articles

Workbloom automatically checks for new recipient data every day when using an HR integration like PeopleXD. However, to make sure you have the latest employee information, you can also manually refresh recipient data.
Step-by-Step Instructions

  • Refresh Recipient Data

  1. Sign in to your Workbloom account.  
  1. Navigate to Recipients List.  
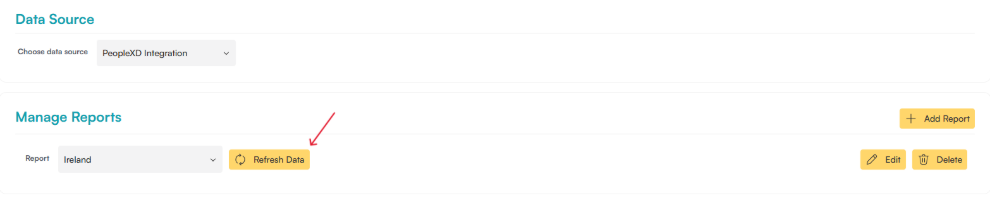
  1. Select the PeopleXD Integration from the Data Source dropdown.  
  1. Select the appropriate report.  
  1. Click Refresh Data.  
  1. Wait for synchronization to complete.  
  1. Review the updated recipient records.  
Data Source set to PeopleXD Integration, with a red arrow pointing to the Refresh Data button next to the report field

Refreshing data helps ensure recipient information remains aligned with the source HR system.

Tips

  • Refresh data after organisational changes.
  • Review synchronization results after every refresh.
  • Verify report selection before refreshing.
  • Monitor integration notifications for issues.

Common Mistakes

  • Refreshing the wrong report.
  • Assuming data updates instantly.
  • Ignoring synchronization warnings.
  • Failing to verify imported recipient records.

Related Articles

Import errors occur when uploaded recipient information does not meet validation requirements. Workbloom provides error information to help identify and correct issues before reprocessing the import.

Step-by-Step Instructions

  • Review Import Errors

  1. Navigate to Recipients List.  
  1. Review the import results.  
  1. Identify records that contain validation errors.  
  1. Review the error details provided.  

  • Correct and Reprocess the File

  1. Update the source file.  
  1. Correct all identified errors.  
  1. Save the updated file.  
  1. Upload the corrected file again.  
  1. Verify that all recipients were imported successfully.  

  • Common Import Errors

  • Missing required fields.
  • Invalid email addresses.
  • Duplicate recipient IDs.
  • Invalid data formats.
  • Unsupported file types

Tips

  • Correct all errors before re-uploading the file.
  • Review import results immediately after processing.
  • Maintain a backup copy of source files.
  • Test imports with smaller files when troubleshooting.

Common Mistakes

  • Re-uploading the same file without correcting errors.
  • Ignoring validation messages.
  • Creating duplicate recipient records.
  • Uploading outdated recipient information.

Related Articles

Recipients Management

The Recipients List provides a central location for viewing and managing recipient records within Workbloom. Recipient information can be imported through an HR integration or uploaded manually and is used when creating reward campaigns.

Step-by-Step Instructions

  • View Recipients

  1. Sign in to your Workbloom account.  
  1. Navigate to Recipients.  
  1. Review the recipient records displayed in the Recipients List.  

The recipient list may include:

  • ID  
  • Name  
  • Surname  
  • Email Address  
  • Start Date  
  • Date of Birth  
  • Manager Name  
  • Manager Email  
  • Country  
  • Status  

Tips

  • Review recipient information regularly to ensure records remain accurate.  
  • Verify recipient status before including recipients in campaigns.  
  • Use sorting and filtering options to locate specific records more efficiently.  

Common Mistakes

  • Overlooking inactive recipients when reviewing campaign eligibility.  
  • Using outdated recipient information.  

Related Articles

Recipient information can be updated when employee details change. Keeping recipient records accurate helps ensure successful reward delivery and reporting.
Step-by-Step Instructions

  • Edit a Recipient Record

  1. Sign in to your Workbloom account.  
  1. Navigate to Recipients.  
  1. Locate the recipient you want to update.  
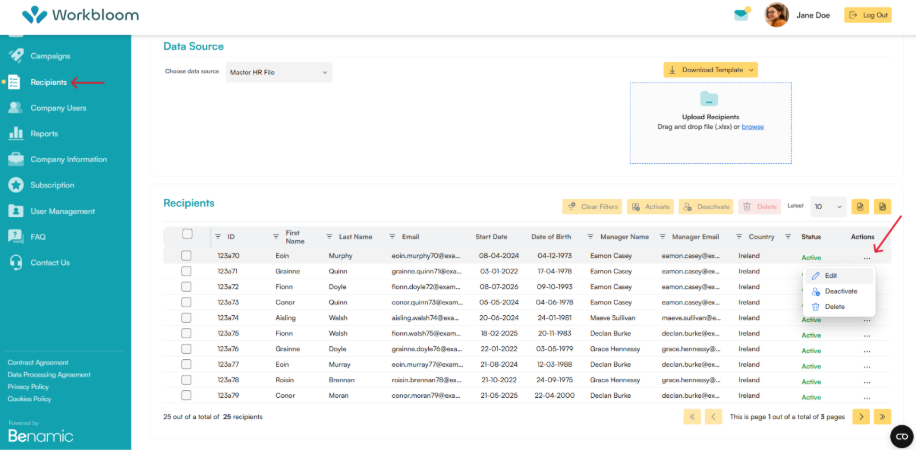
  1. Select the Actions menu.  
  1. Select Edit.  
The Recipients list with a red arrow pointing to Actions and the dropdown menu with Edit option

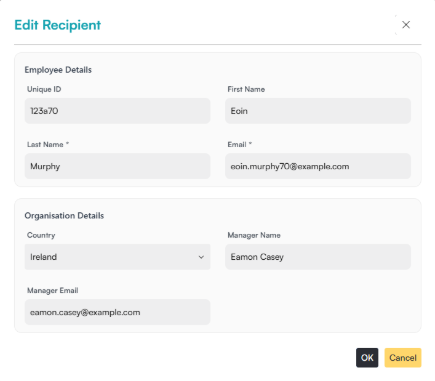
  1. Update the required information.  
  1. Save your changes.  
The Edit Recipient dialog box

  • Information That May Be Updated

Depending on your configuration, recipient records may include:

  • First Name  
  • Last Name  
  • Email Address  
  • Manager Name  
  • Manager Email  
  • Country  

Tips

  • Verify email addresses before saving updates.  
  • Review manager information when organisational changes occur.  
  • Update recipient records promptly to maintain data accuracy.  

Common Mistakes

  • Entering incorrect email addresses.  
  • Forgetting to save changes.  
  • Leaving outdated recipient information in the system.  

Related Articles

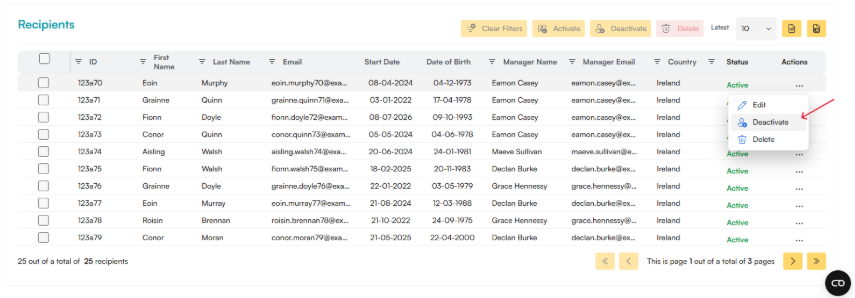
Recipient records can be activated or deactivated as employment status or eligibility changes. Inactive recipients remain stored in Workbloom but may not be available for certain platform activities.
Step-by-Step Instructions

  • Deactivate a Recipient

  1. Sign in to your Workbloom account.  
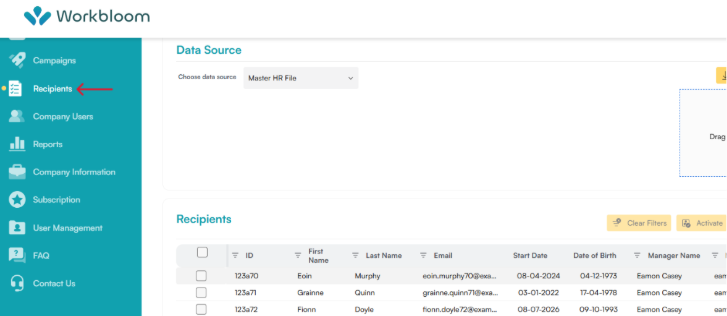
  1. Navigate to Recipients.  
Workbloom dashboard with red arrow pointing to the Recipients section in the sidebar navigation

  1. Locate the recipient record.  
  1. Open the Actions menu.  
  1. Select Deactivate.  
Recipients table with an open Actions menu for a recipient, highlighting the Deactivate option

  • Reactivate a Recipient

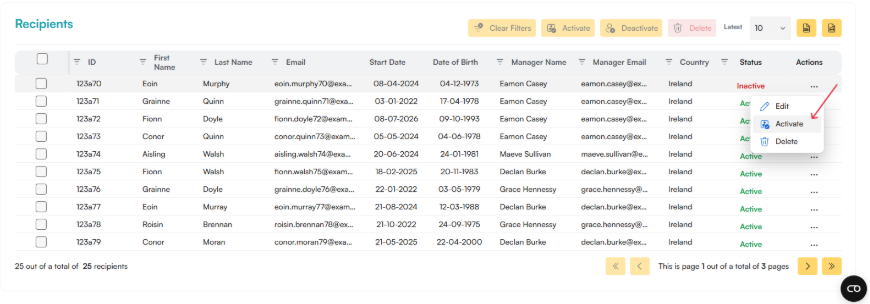
  1. Locate the recipient record.  
  1. Open the Actions menu.  
  1. Select Activate.
Recipients table with an open Actions menu for a recipient, highlighting the Activate option

Tips

  • Deactivate recipients who no longer require participation in campaigns.  
  • Review inactive records periodically.  
  • Confirm recipient status before launching campaigns.  

Common Mistakes

  • Deactivating the wrong recipient.  
  • Assuming deactivation permanently deletes recipient data.  
  • Forgetting to review recipient status after organisational changes.  

Related Articles

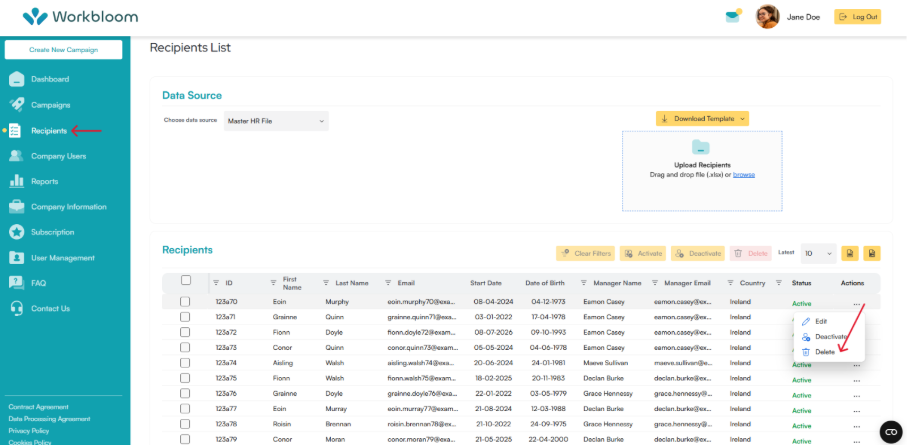
Recipients can be removed from Workbloom when records are no longer required. Administrators should review recipient information carefully before deletion.
Step-by-Step Instructions

  • Delete a Recipient

  1. Sign in to your Workbloom account.  
  1. Navigate to Recipients.  
  1. Locate the recipient record.  
  1. Open the Actions menu.  
  1. Select Delete.  
Recipients List page with a red arrow pointing to Recipients in the sidebar, and a red arrow pointing to the Delete option in an open Actions menu for a recipient

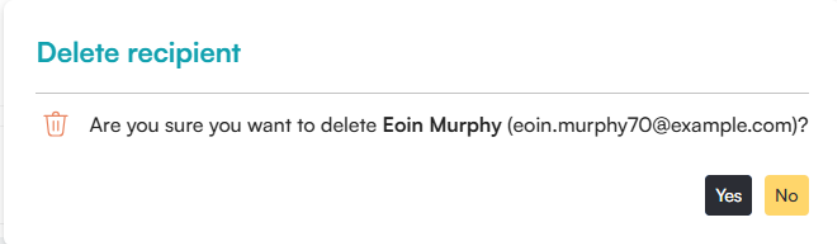
  1. Confirm the deletion.  
Delete recipient confirmation dialog

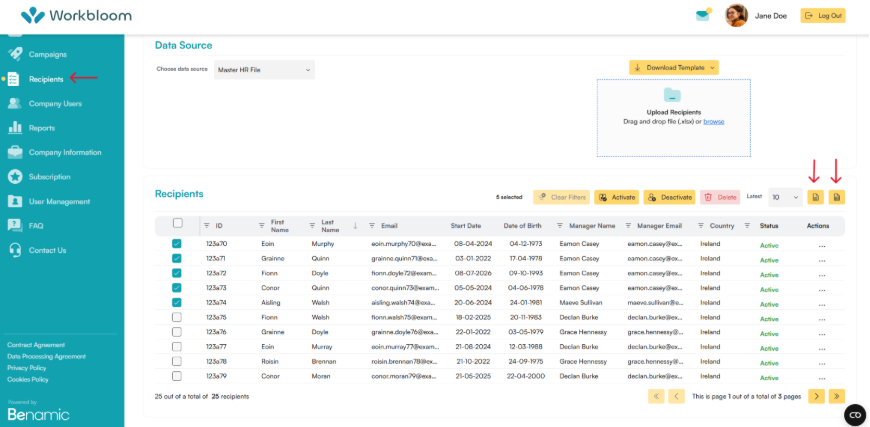
  • Delete Multiple Recipients

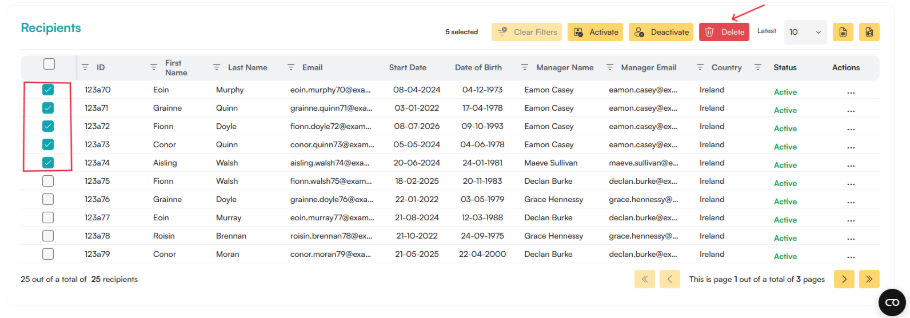
  1. Select the checkbox next to each recipient.  
  1. Select Delete.  
  1. Confirm the deletion.  
Recipients table with a red box around five checked checkboxes for selected recipients and a red arrow pointing to the Delete button

Tips

  • Review recipient information before deletion.  
  • Consider whether deactivation is more appropriate than deletion.  
  • Use bulk actions carefully when deleting multiple records.  

Common Mistakes

  • Deleting the wrong recipient.  
  • Selecting multiple records unintentionally.  
  • Removing records before verifying they are no longer needed.  

Related Articles

Workbloom provides tools to help administrators locate and manage recipient records efficiently.

Step-by-Step Instructions

  • Sort Recipient Records

  1. Navigate to Recipients.  
  1. Select a column heading.  
  1. Review the sorted results.  

Available columns may include:

  • ID  
  • First Name  
  • Last Name
  • Email  
  • Start Date  
  • Date of Birth
  • Manager Name
  • Manager Email
  • Country  
  • Status  

  • Clear Applied Filters

  1. Navigate to Recipients.  
  1. Select Clear Filters.  
  1. Review the refreshed recipient list.  

Tips

  • Sort by status to identify inactive recipients quickly.  
  • Sort by name when reviewing employee records.  
  • Clear filters when expected records are not visible.  

Common Mistakes

  • Forgetting that filters are applied.  
  • Reviewing incomplete result sets caused by active filters.  
  • Assuming missing records have been deleted when they are simply filtered out.  

Related Articles

Recipient information can be exported from Workbloom for reporting, auditing, or administrative purposes. The available formats include CSV or Excel.
Step-by-Step Instructions

  • Export Recipient Data

  1. Navigate to Recipients.  
  1. Apply any required filters.  
  1. Select one of the available export options.  
  1. Download the generated file.  
  1. Review the exported recipient data.  
Recipients page with a red arrow pointing to Recipients in the sidebar, and two red arrows pointing to the export icon buttons above the recipients table

The exported file may contain recipient information currently displayed within the recipient list.

Tips

  • Apply filters before exporting if only specific records are required.  
  • Review exported data before sharing externally.  
  • Store exported files securely.  

Common Mistakes

  • Exporting data without first applying the required filters.  
  • Sharing exported recipient information without appropriate controls.  
  • Using outdated exports for reporting purposes.  

Related Articles

Recipient statuses provide information about the current state of recipient records within Workbloom.

Available Statuses

  • Active

The recipient is active and available within the platform.

  • Inactive

The recipient record remains in Workbloom but has been deactivated.

Tips

  • Review recipient statuses regularly.  
  • Confirm recipient status before creating campaigns.  
  • Investigate unexpected inactive records before launching rewards.  

Common Mistakes

  • Assuming inactive recipients have been deleted.  
  • Overlooking recipient status during campaign preparation.  
  • Forgetting to update the recipient status after organisational changes.  

Related Articles