Back

knowledge base

Getting Started

Account Setup

Creating a Workbloom account is the first step toward setting up your organisation and sending employee rewards. You can create an account using your email address or sign in using a supported provider such as Google or Microsoft.

Once registration is complete, you will need to verify your email address and complete the company onboarding before your account can be reviewed.

Step-by-Step Instructions

  • Create an account using email

  1. Go to the Workbloom Sign Up page.  
  1. Enter the required information:  
  • Email
  • Password  
  • Confirm Password
  1. Click Sign Up.  

After submitting your information, Workbloom will send a verification email to the address you provided.

  • Create an account using Google or Microsoft

You can also register using a Google Account or a Microsoft Account.  

  1. Select Continue with Google or Continue with Microsoft on the Sign Up page.  
  1. Complete authentication with your provider.  
  1. Follow the onboarding process after login.  

  • Password Requirements

When creating an account, passwords must include:

  • At least 8 characters  
  • One uppercase letter  
  • One lowercase letter  
  • One number  
  • One special character  

Using a strong password helps protect your account and company information.

Tips

  • Use a company email address whenever possible to simplify account verification and approval.
  • Create a strong password that meets all security requirements.
  • Verify your email address promptly to avoid delays in the onboarding process.
  • Complete company onboarding immediately after registration to speed up account approval.

Common Mistakes

  • Using an Incorrect Email Address - If your email address is entered incorrectly, you will not receive the verification email.
  • Weak Password Selection - Passwords that do not meet security requirements will not be accepted.
  • Forgetting to Verify the Email - Your account setup cannot continue until your email address has been confirmed.

Related Articles

After creating a Workbloom account, you must verify your email address before continuing with company onboarding and account activation. A verification email is automatically sent to the email address used during registration. Until your email is verified, account setup cannot continue.

Step-by-Step Instructions

  • Verify Your Email Address

  1. Open the inbox of the email address used during registration.
  1. Locate the email from Workbloom.
  1. Open the message and click the verification link.
  1. Wait for confirmation that your email has been successfully verified.
  1. Continue with the company onboarding process.

  • Resend a Verification Email

If you did not receive the verification email:
  1. Return to the Login page.
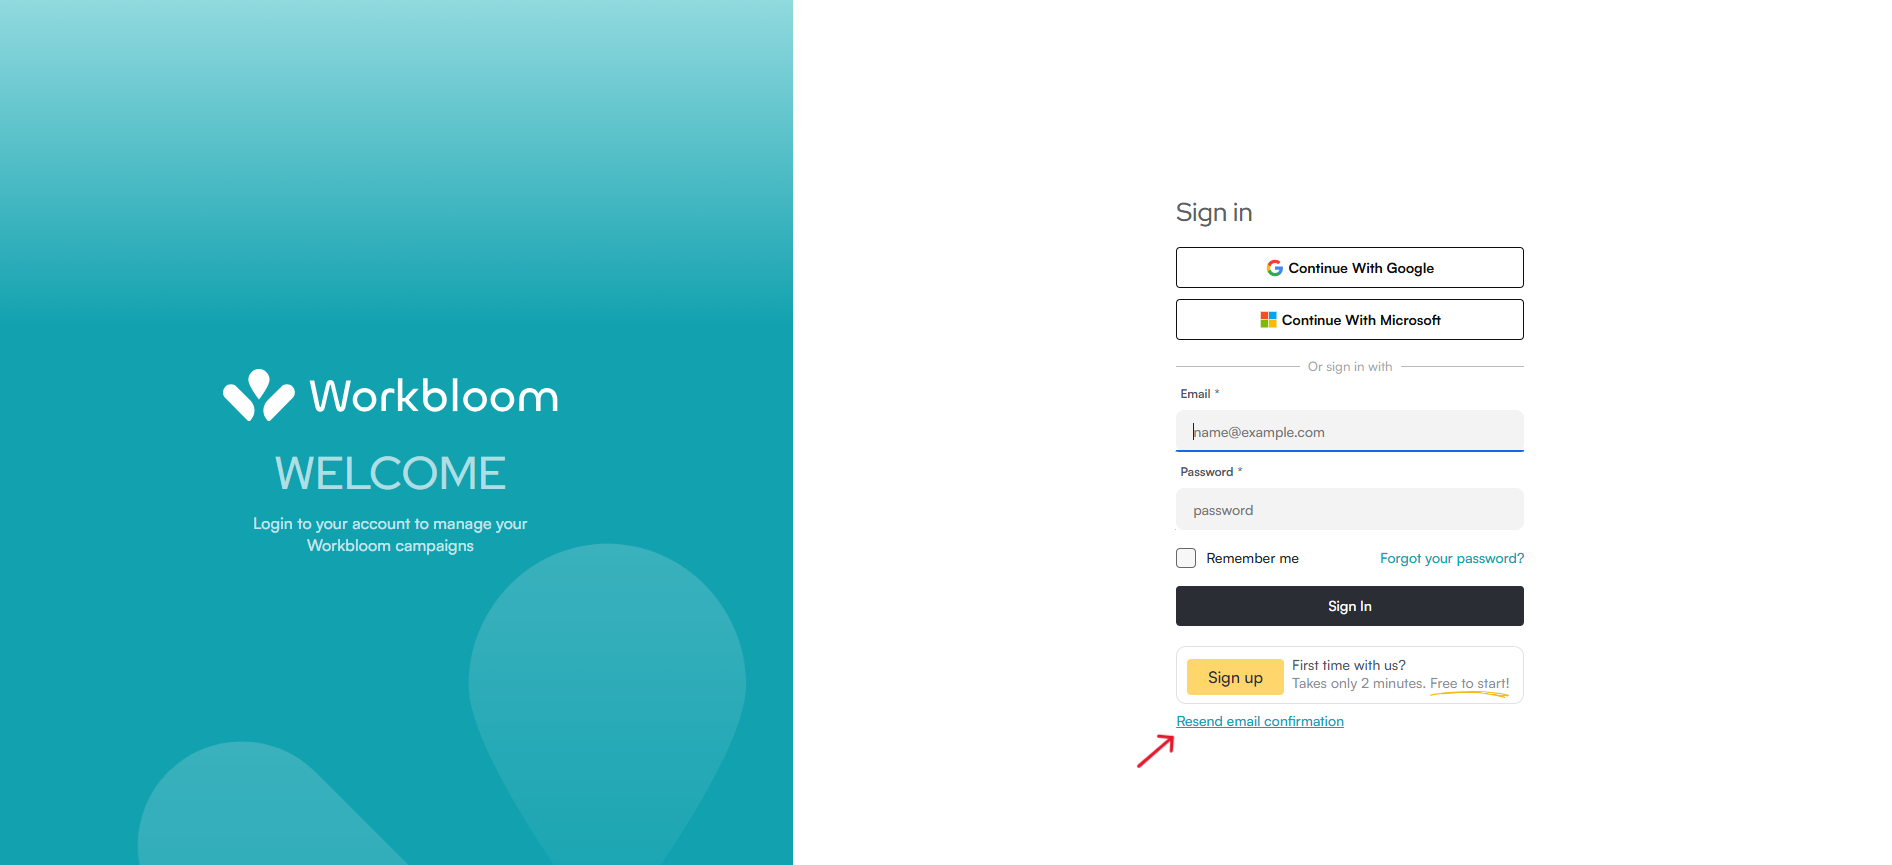
  1. Select Resend Email Confirmation.

Workbloom Login page with a red arrow pointing to the 'Resend email confirmation' link below the Sign In button

  1. Check your inbox again.

Before requesting another email, make sure to check your Spam or Junk folder.

Tips

  • Check your Spam or Junk folder if the verification email is not visible in your inbox.
  • Add Workbloom to your safe sender list to improve email delivery.
  • Verify your email as soon as possible to continue onboarding.
  • Request a new verification email if the original link has expired.

Common Mistakes

  • Checking the Wrong Inbox - Make sure you are signed into the same email account used during registration.
  • Not Checking the Spam Folder - Verification emails may occasionally be filtered into spam or junk folders.
  • Clicking an Expired or Invalid Link - If the verification link no longer works, request a new confirmation email.
  • Trying to Continue Without Verification - Company onboarding and account activation require a verified email address.

Related Articles

After verifying your email address, you must complete the company onboarding before your account can be reviewed and approved.

Company onboarding allows Workbloom to verify your organisation and configure access to platform features and reward types.
Step-by-Step Instructions

  • Complete Company Onboarding

  1. Sign in to your Workbloom account.
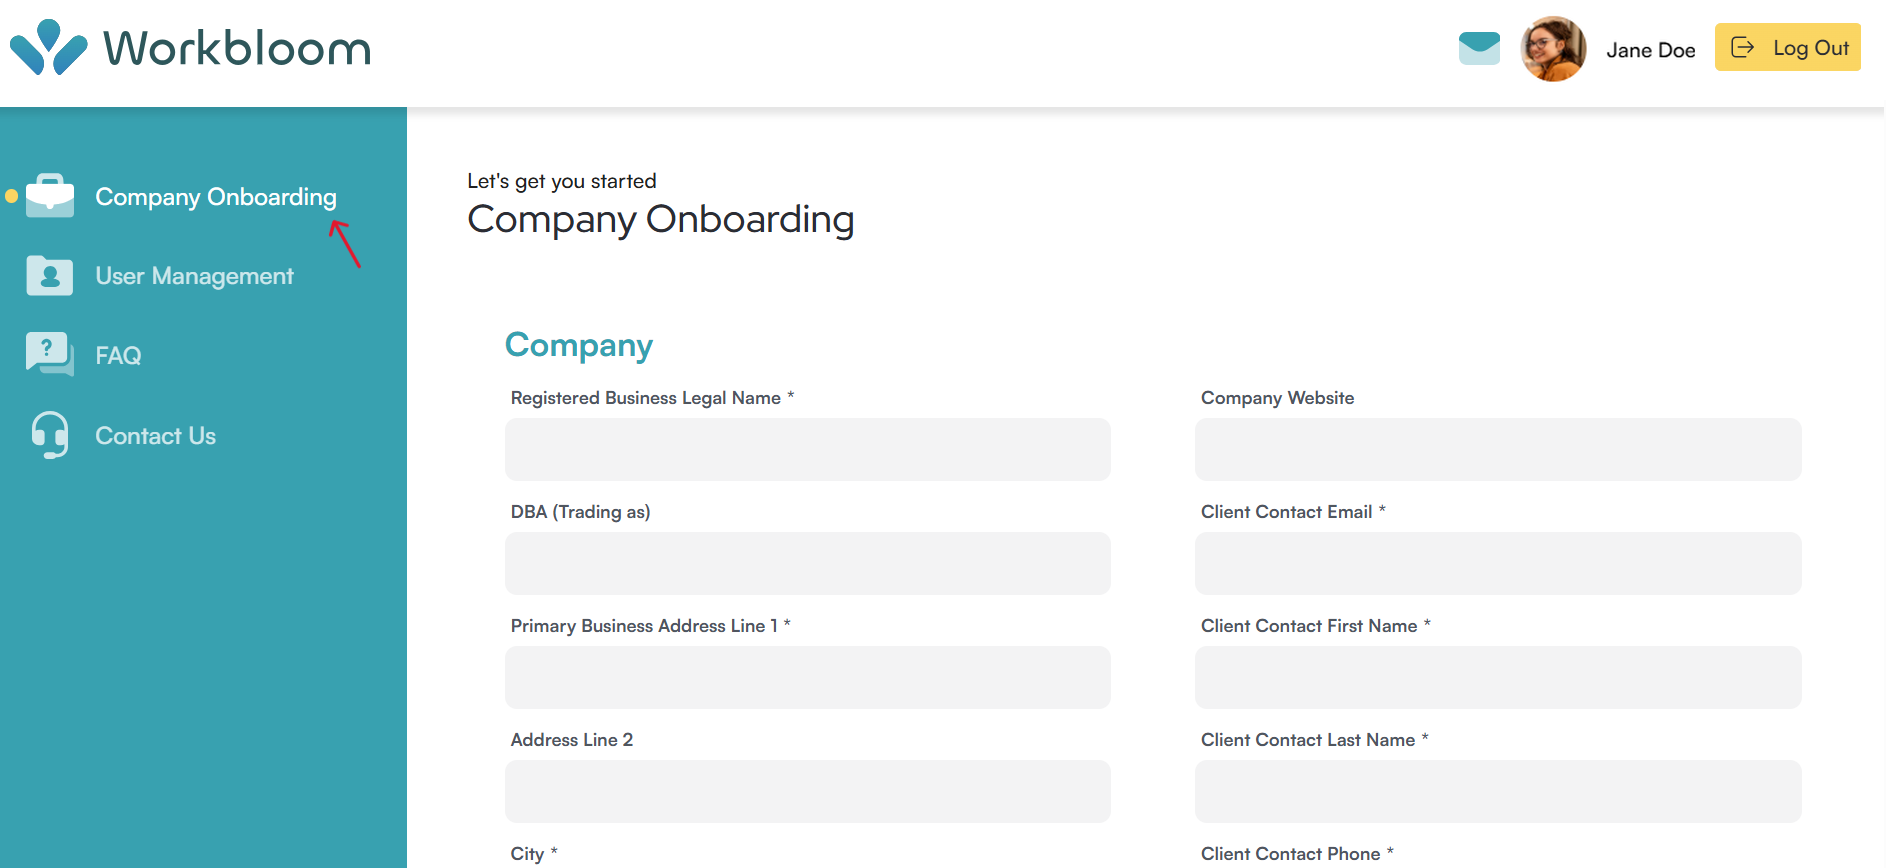
  1. Navigate to the Company Onboarding section.

The Workbloom main dashboard menu showing the Company Onboarding section

  1. Complete all required company information fields.
  1. Review the information provided for accuracy.
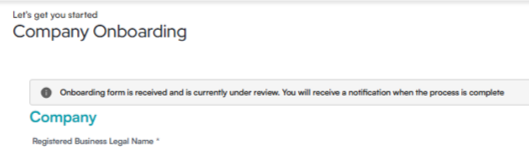
  1. Submit the onboarding form for review. You will get this message:

Workbloom company onboarding form received message

Your onboarding request will be reviewed by the Workbloom team.

  • What Information May Be Required

Depending on your organisation type and account setup, you may be asked to provide:

  • Company details
  • Business registration information
  • Contact details
  • Billing or payment-related information

Some additional verification may be required for certain reward types, such as prepaid cards.

Tips

  • Ensure all company information is accurate before submitting onboarding.
  • Prepare any required business verification details in advance.
  • Review all submitted information carefully to avoid approval delays.
  • Complete onboarding as soon as possible after email verification.

Common Mistakes

  • Submitting Incomplete Information - Missing required fields may delay the onboarding review process.
  • Entering Incorrect Company Details - Incorrect business information may require additional verification.
  • Delaying Onboarding Completion - Your account cannot proceed to approval until onboarding has been submitted.

Related Articles

Workbloom accounts move through different statuses during onboarding and approval. Your account status determines which platform features and reward types are available. Understanding account statuses can help explain why certain functionality may not yet be accessible.

Understanding Workbloom Account Statuses

Workbloom accounts typically move through the following stages:

  • Precative

Your account has been created, but onboarding is still under review.

At this stage:

  • Company verification may still be in progress
  • Platform access may be limited
  • Reward functionality may not yet be available

  • Active

Your account has been approved for standard reward functionality.

At this stage:

  • Voucher campaigns can be created and sent
  • Standard platform features become available

  • Finalised

Your account has completed additional verification requirements.

At this stage:

  • Voucher campaigns are available
  • Prepaid card rewards may become accessible
  • Full platform functionality may be enabled

Tips

  • Monitor your account status regularly during onboarding.
  • Review any requests for additional verification promptly.
  • Do not assume all reward types are available immediately after approval.
  • Contact support if your account status remains unchanged for an extended period.

Common Mistakes

  • Assuming All Features Are Immediately Available - Some reward types may require additional approval steps.
  • Confusing Approval with Finalisation - An approved account may still require additional verification for certain functionality.
  • Ignoring Account Notifications - Changes to account status are typically communicated through account notifications or email.

Related Articles

After company onboarding has been completed, your account enters the approval process. During this stage, Workbloom reviews the information submitted to verify your organisation and determine access to platform features and reward options.

Step-by-Step Instructions

  • What Happens During Account Review

  1. Complete and submit the company onboarding.
  1. The Workbloom team reviews your submitted information.
  1. Additional verification may be requested if required.
  1. Once approved, you will receive confirmation by email.
  1. Your account status will be updated.

The review process may take up to 5 working days.

  • After Approval

Once your account is approved:

  • You can access platform features based on your account status.
  • Voucher functionality may become available immediately.
  • Additional verification may be required for prepaid cards.

Tips

  • Submit complete and accurate company information during onboarding.
  • Monitor your email for requests from the Workbloom team.
  • Respond quickly if additional verification is required.
  • Allow sufficient time for the review process before planning campaigns.

Common Mistakes

  • Submitting Incorrect Company Information - Incorrect information may delay account review.
  • Expecting Immediate Approval - Approval can take several working days, depending on verification requirements.
  • Missing Requests for Additional Information - Some accounts may require follow-up verification before approval.

Related Articles

User Management

Administrators can invite additional users to access the Workbloom platform. Invited users receive an email invitation and can access the platform based on their assigned role.
Step-by-Step Instructions

  • Invite a New User

  1. Sign in to your Workbloom account.  
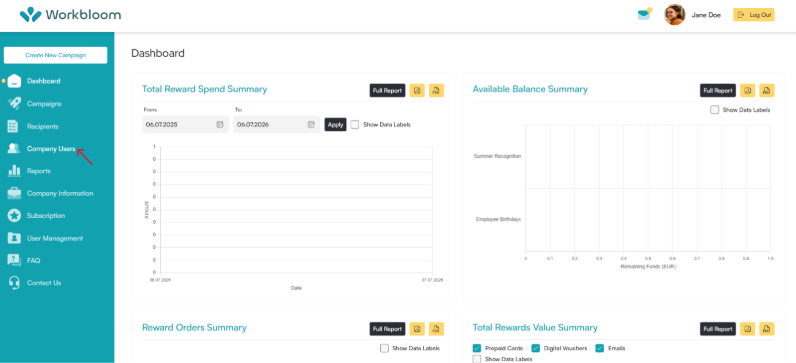
  1. Navigate to Company Users.
Workbloom dashboard with a red arrow pointing to Company Users in the sidebar navigation

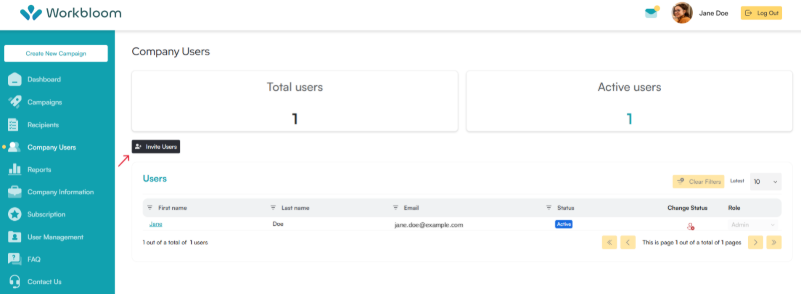
  1. Select Invite Users.  
Company Users page with a red arrow pointing to the Invite Users button

  1. Enter the user's email address.  
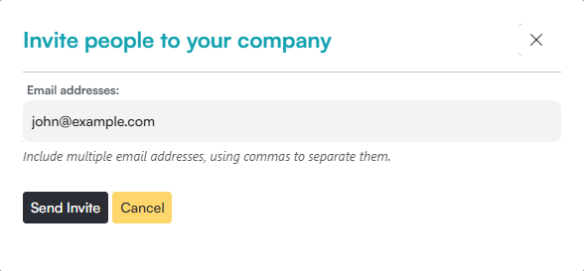
Invite people to your company dialog with an email address field

  1. Send the invitation.  

The invited user will receive an email containing instructions to access the platform.

Tips

  • Verify the user's email address before sending the invitation.
  • Assign the appropriate role based on the user's responsibilities.
  • Review user access regularly to ensure permissions remain up to date.
  • Remove access promptly when users no longer require platform access.

Common Mistakes

  • Entering an incorrect email address.
  • Assigning the wrong user role.
  • Assuming access is available before the invitation has been accepted.

Related Articles

User roles determine what actions a user can perform within Workbloom. Administrators can assign and update roles as responsibilities change.
Step-by-Step Instructions

  • View or Change a User Role

  1. Sign in to your Workbloom account.  
  1. Navigate to Company Users.  
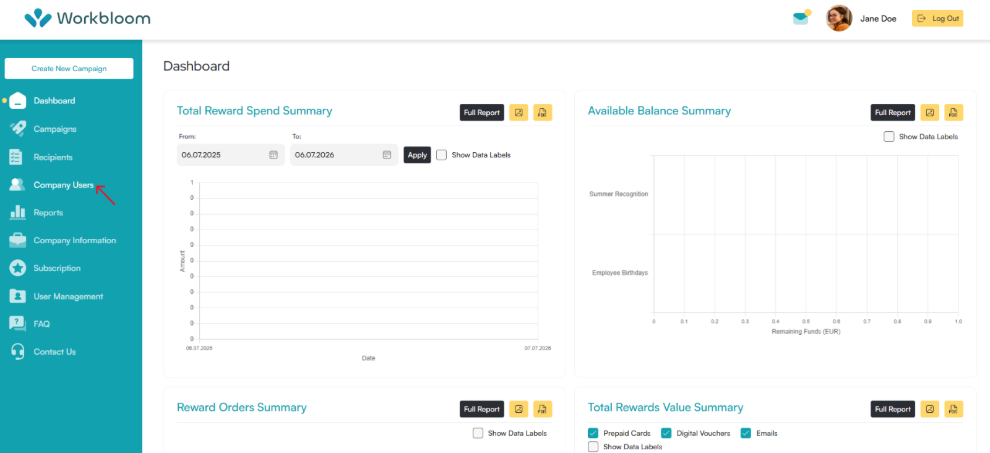
Workbloom dashboard with a red arrow pointing to Company Users in the sidebar navigation

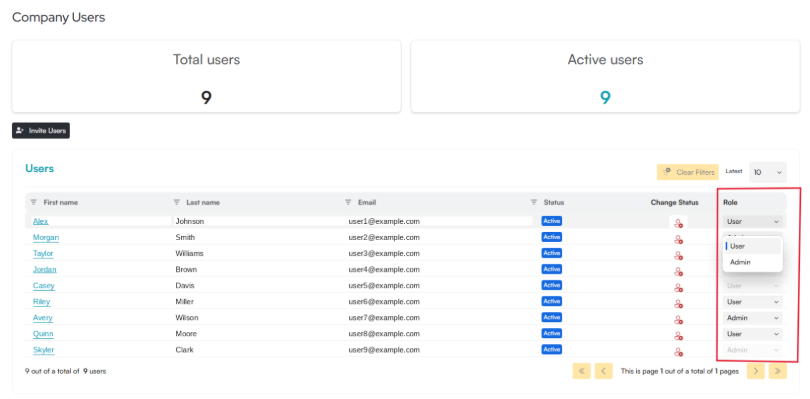
  1. Locate the user you want to manage.  
Company Users table with the Role column highlighted, showing a dropdown open for one user with User and Admin options

  1. Review the current role.  
  1. Update the role if required.  

  • Available Roles

  • Admin
  • Full access to platform administration features.
  • Can manage users and platform settings.

  • User
  • Standard platform access based on assigned permissions.

Tips

  • Apply the principle of least privilege and grant Admin access only when necessary.
  • Review user roles periodically, especially after organisational changes.
  • Remove elevated permissions when they are no longer required.
  • Ensure role assignments align with internal company policies.

Common Mistakes

  • Assigning Admin access unnecessarily.
  • Forgetting to review roles after team changes.
  • Granting elevated access to temporary users.

Related Articles

Administrators can activate or deactivate user accounts as team membership changes. Deactivated users cannot access the platform until they are reactivated.
Step-by-Step Instructions

  • Deactivate a User

  1. Sign in to your Workbloom account.  
  1. Navigate to Company Users.  
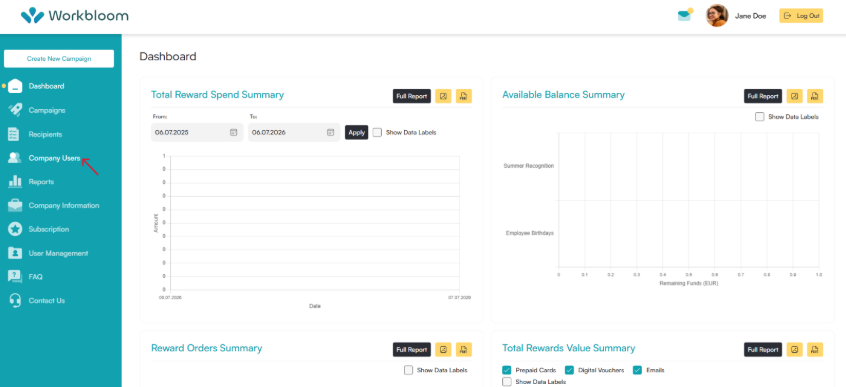
Workbloom dashboard with a red arrow pointing to Company Users in the sidebar navigation

  1. Locate the user account.  
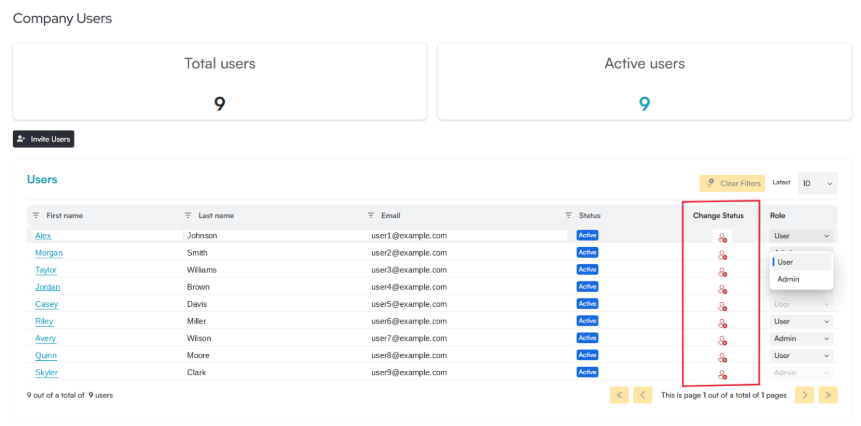
  1. Select the deactivate option.  
Company Users table with the Change Status column highlighted, showing an icon for each user used to deactivate or activate their account

  1. Confirm the action.  

  • Reactivate a User

  1. Select the activate option.  
  1. Confirm the change.  

The user can sign in again after the account is reactivated.

Tips

  • Deactivate users as soon as they no longer require platform access.
  • Review inactive accounts periodically.
  • Remember that deactivation removes access but does not delete historical user records.
  • Maintain accurate user access as team membership changes.

Common Mistakes

  • Deactivating the wrong user account.
  • Forgetting to remove access for former employees.
  • Assuming deactivation deletes user data.

Related Articles

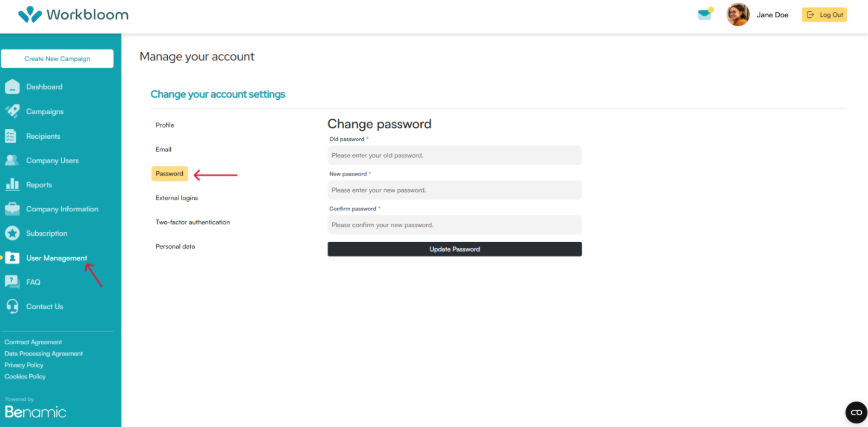
Your login credentials allow secure access to your Workbloom account. If your password changes or you need to improve account security, you can update your login credentials through account settings.
Step-by-Step Instructions

  • Update Your Password

  1. Sign in to your Workbloom account.  
  1. Navigate to User Management.
  1. Select Password.  
  1. Enter your current password.  
  1. Create a new password.  
  1. Confirm the new password.  
  1. Save your changes.  
Sidebar navigation showing User Management and Password highlighted

  • Password Requirements

Passwords must include:

  • At least 8 characters  
  • One uppercase letter  
  • One lowercase letter  
  • One number  
  • One special character  

  • Reset a Forgotten Password

If you cannot sign in:

  1. Navigate to the Login page.  
  1. Select Forgot Password.  
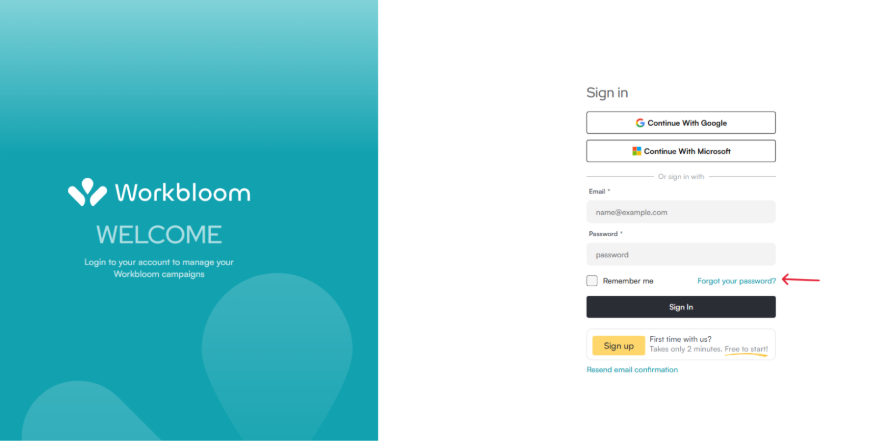
Sign-in page with Forgot your password? link highlighted

  1. Enter your registered email address.  
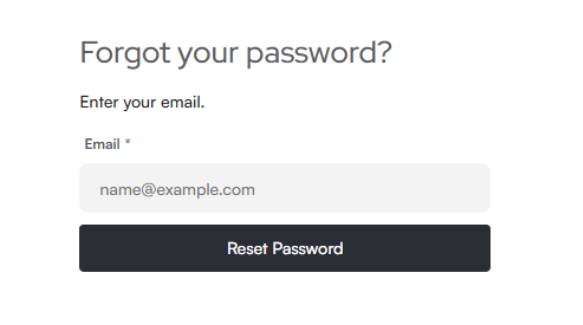
Forgot your password form with an email field and a Reset Password button

  1. Follow the password reset instructions sent by email.  

Tips

  • Use a unique password that is not shared with other systems.
  • Update passwords periodically according to company security policies.
  • Store passwords securely using approved password management tools.
  • Change your password immediately if you suspect unauthorized access.

Common Mistakes

  • Choosing a Weak Password - Passwords that do not meet security requirements may not be accepted.
  • Forgetting Current Credentials - Your current password may be required before changes can be saved.
  • Ignoring Password Security - Avoid reusing passwords from other systems.

Related Articles

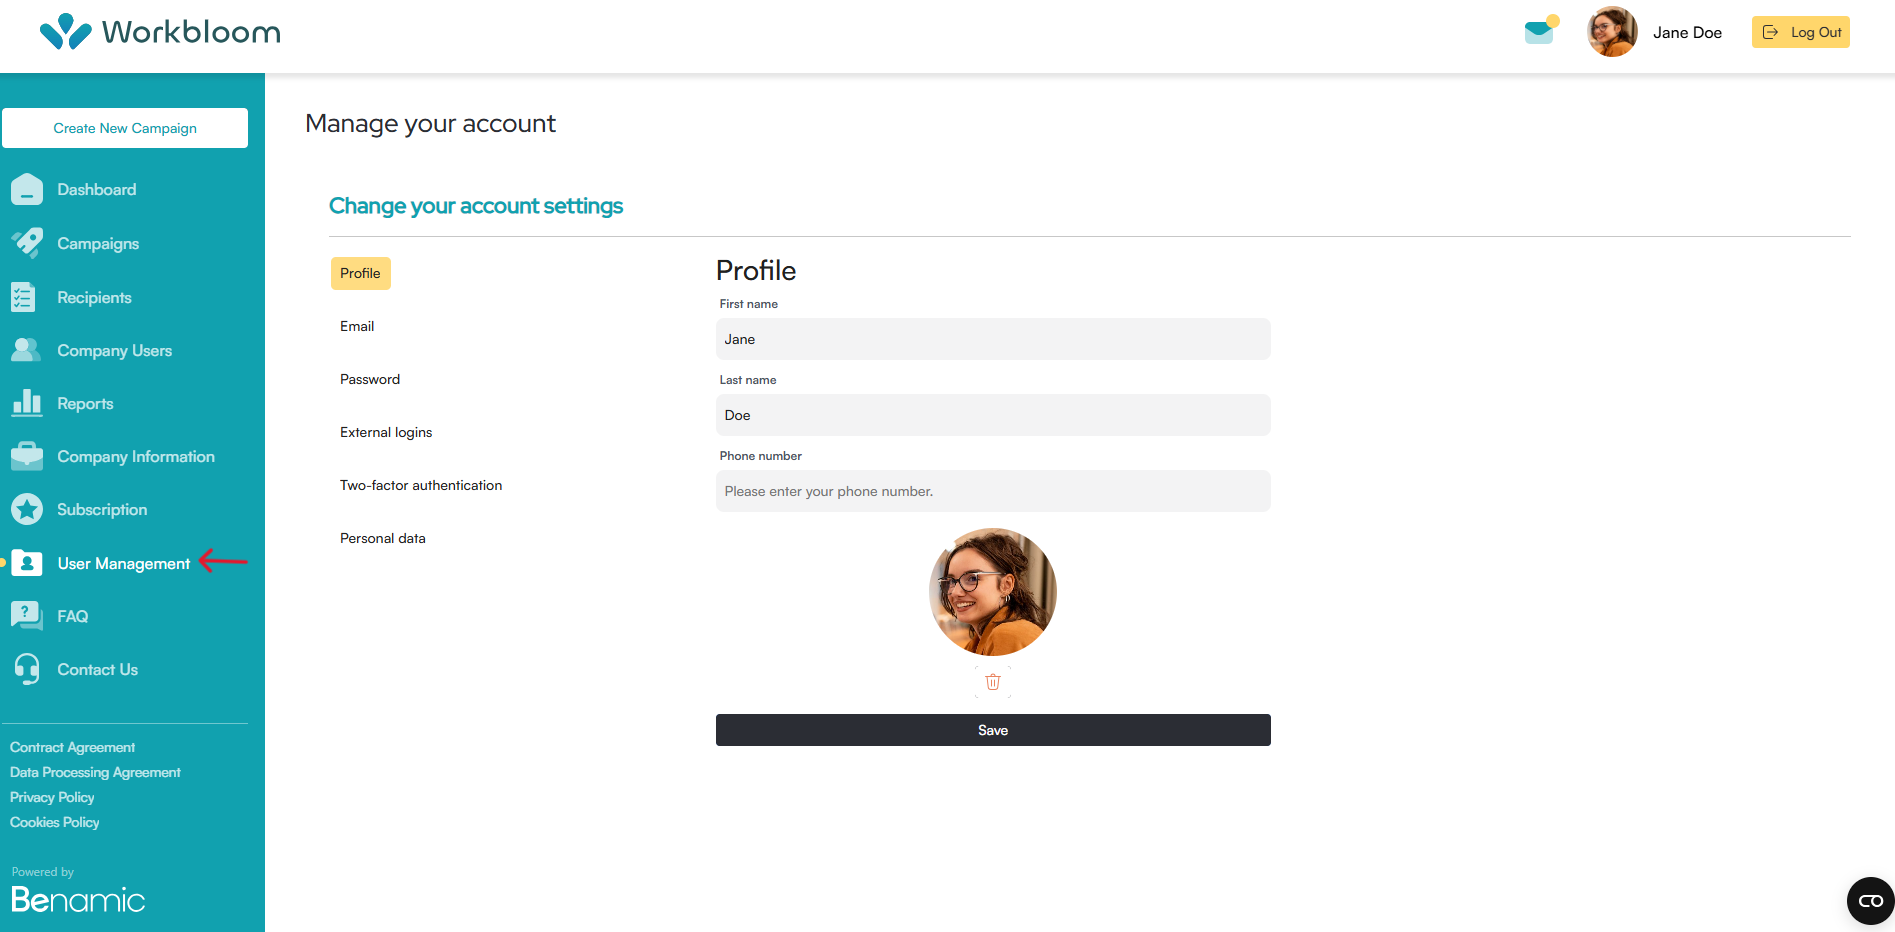
Your profile information helps keep account details accurate and ensures Workbloom communications are sent to the correct contact. You should review profile details regularly and update them when changes occur.
Step-by-Step Instructions

  1. Sign in to your Workbloom account.  
  1. Navigate to User Management.  
  1. Review your profile information.  
  1. Update relevant details if needed.  
  1. Save your changes.  

Manage your account page with a red arrow pointing to User Management in the sidebar, showing the Profile tab

Profile information may include:

  • First Name  
  • Last Name  
  • Contact Information  

Some account details may be restricted depending on account settings or the authentication method.

Tips

  • Keep your contact details up to date.
  • Use an email address that you actively monitor.
  • Review profile information periodically for accuracy.
  • Save all changes before leaving the page.

Common Mistakes

  • Leaving Profile Information Outdated - Incorrect contact information may result in missed notifications.
  • Using an Inaccessible Email Address - Important account communications may be missed.
  • Forgetting to Save Changes - Updates may not apply unless changes are saved successfully.

Related Articles

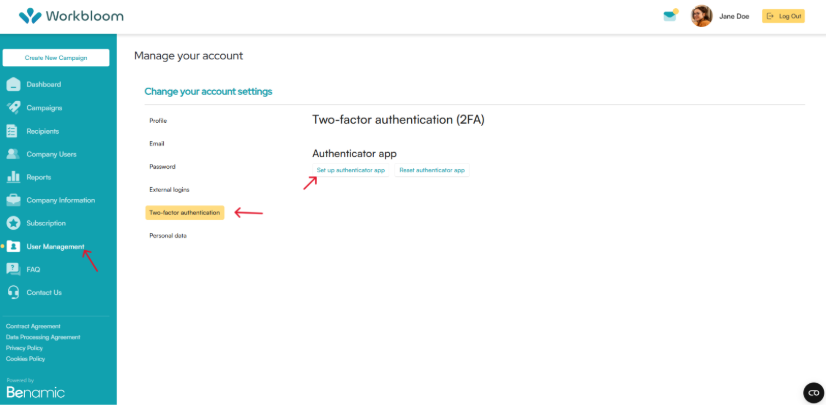
Two-Factor Authentication (2FA) provides an additional layer of account security by requiring a second verification step during sign-in. Enabling 2FA helps protect account access and company information.
Step-by-Step Instructions

  • Enable Two-Factor Authentication

  1. Sign in to your Workbloom account.  
  1. Navigate to User Management.
  1. Locate Two-Factor Authentication (2FA).  
Workbloom account settings with arrows pointing to User Management in the sidebar, the Two-factor authentication tab, and the Set up authenticator app link

  1. Follow the setup instructions.  
  1. Complete the verification process.  
  1. Save your security settings.  

Once enabled, you may be asked to verify your identity during future sign-ins.

  • Disable or Update 2FA

If needed:

  1. Navigate to User Management.
  1. Update or disable existing 2FA settings.  
  1. Complete any required verification.  

Tips

  • Enable 2FA for all administrator accounts whenever available.
  • Keep backup authentication methods available when possible.
  • Review security settings regularly.
  • Update authentication methods if devices change.

Common Mistakes

  • Not Completing Setup - 2FA protection only applies after setup is completed successfully.
  • Losing Access to Verification Methods - Ensure backup access methods are available when possible.
  • Ignoring Additional Security Prompts - Future sign-ins may require additional authentication.

Related Articles

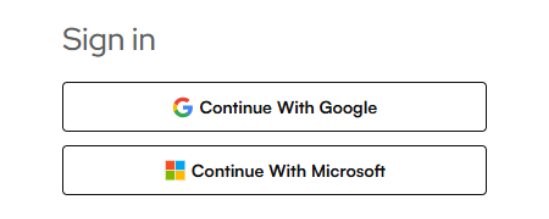
Workbloom supports external login providers to simplify account access. You can sign in using Google or Microsoft, depending on how your account was originally configured.
Step-by-Step Instructions

  • Sign In Using Google or Microsoft

  1. Navigate to the Workbloom Login page.  
  1. Select Continue with Google or Continue with Microsoft.  
Workbloom sign in page with two buttons Continue With Google and Continue With Microsoft

  1. Complete authentication with your provider.  
  1. Access your Workbloom account.  

External logins may reduce the need to manage separate passwords.

  • Switching Login Methods

Depending on account setup, switching between password login and external login methods may require additional account verification.

Tips

  • Use the same Google or Microsoft account that was used during registration.
  • Keep your identity provider credentials secure.
  • Sign out of shared devices after use.
  • Contact your administrator if authentication issues persist.

Common Mistakes

  • Using the Wrong Account - Make sure you sign in with the same Google or Microsoft account used during registration.
  • Authentication Failures - Expired sessions or provider login issues may prevent sign-in.
  • Confusing Login Methods - Accounts created with Google or Microsoft should generally continue using the same authentication method.

Related Articles

Notifications & Terms

Workbloom provides notifications to keep users informed about important account activity, onboarding updates, campaign progress, and reward-related actions. Notifications help ensure users are aware of important updates and any actions required within the platform.
Step-by-Step Instructions

  • View Notifications

  1. Sign in to your Workbloom account.  
  1. Review available notifications within the platform interface.  
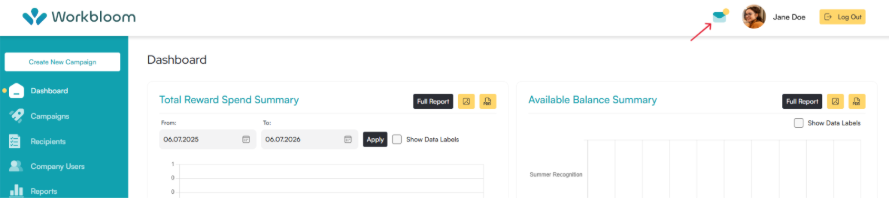
Workbloom dashboard with a red arrow pointing to the notifications icon in the top right, next to the user profile

  1. Open any notification that requires action or additional review.  
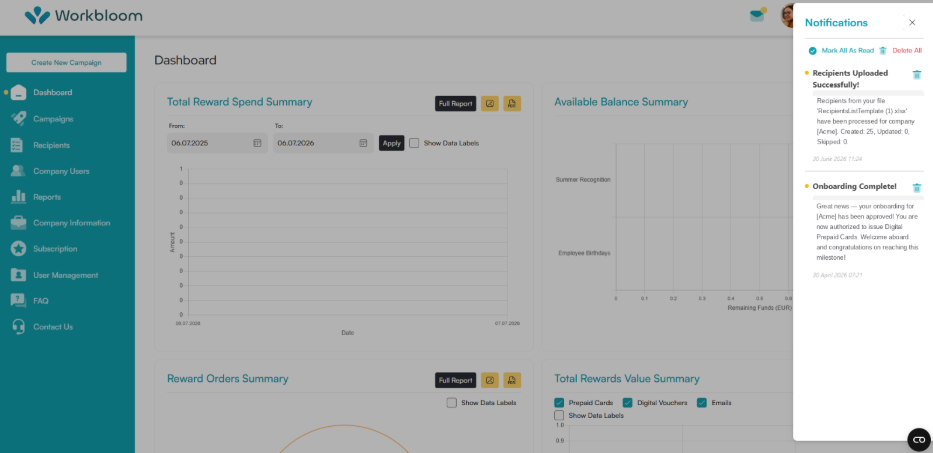
Notifications panel open on the Workbloom dashboard, showing Mark All As Read and Delete All options above a list of two notifications

Notifications may relate to:

  • Account onboarding updates  
  • Account approval status  
  • Campaign activity  
  • Reward delivery updates  
  • Platform-related actions  

Some notifications may also be delivered via email, depending on the type of update.

Tips

  • Review notifications regularly to stay informed about account and campaign activity.
  • Monitor both platform notifications and email communications.
  • Address action-required notifications promptly.
  • Keep your contact information up to date to avoid missing important updates.

Common Mistakes

  • Ignoring Notifications - Important account or campaign updates may be missed.
  • Missing Email Communications - Some important platform updates may also be sent by email.
  • Delaying Required Actions - Certain notifications may require follow-up action before campaigns or rewards can proceed.

Related Articles

Users must review and accept the Terms of Use before accessing Workbloom services. Acceptance of the Terms of Use is required during account registration and may be required again if terms are updated.

Step-by-Step Instructions

  • Accept the Terms of Use

  1. Review the Terms of Use during account registration or onboarding.  
  1. Read the information carefully.  
  1. Confirm acceptance to continue account setup or platform access.  

The Terms of Use explain important platform rules, responsibilities, and conditions for using Workbloom services.

You can access and review the current terms at any time from your Workbloom Dashboard:

Workbloom sidebar with a red arrow pointing to the Contract Agreement link in the footer

  • What the Terms of Use Cover

The Terms of Use may include:

  • Platform usage requirements  
  • User responsibilities  
  • Account obligations  
  • Service conditions  
  • Acceptable use expectations  

Users should review updates to the Terms of Use when notified.

Tips

  • Review the Terms of Use before accepting them.
  • Monitor notifications about updates to platform terms.
  • Ensure authorised representatives review legal agreements when required.
  • Retain copies of accepted agreements according to internal policies.

Common Mistakes

  • Skipping Review of the Terms - Users should understand platform responsibilities before acceptance.
  • Not Completing Acceptance - Account setup cannot continue without accepting the required terms.
  • Ignoring Updated Terms - Platform updates may occasionally require users to review and accept revised terms.

Related Articles

The Data Processing Agreement (DPA) explains how Workbloom processes and protects personal data as part of platform usage. The agreement supports data protection obligations and helps organisations understand how employee and company information is handled.
Step-by-Step Instructions

  • Review the Data Processing Agreement

  1. Review the Data Processing Agreement (DPA) during onboarding or when requested.  
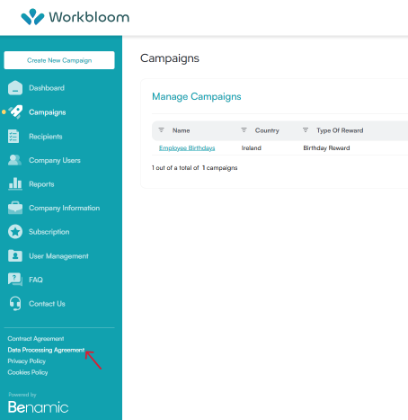
Workbloom dashboard with a red arrow pointing to the Data Processing Agreement link in the sidebar footer

  1. Read the agreement carefully.  
  1. Confirm acceptance if required.  

The DPA helps clarify responsibilities regarding personal data processing and compliance requirements.

  • What the DPA Covers

The DPA may include information about:

  • Personal data handling  
  • Employee data processing  
  • Data security responsibilities  
  • GDPR-related obligations  
  • Data retention practices  

The agreement supports transparency regarding how employee data is managed within Workbloom.

Tips

  • Review the DPA before importing employee data.
  • Ensure internal stakeholders understand data processing responsibilities.
  • Keep records of accepted agreements for compliance purposes.
  • Review updates to the DPA whenever notified by Workbloom.

Common Mistakes

  • Not Reviewing Data Processing Responsibilities - Organisations should understand how employee information is handled.
  • Assuming Internal Policies Replace the DPA - The DPA outlines platform-specific responsibilities.
  • Delaying Acceptance if Required - Some onboarding or account processes may require DPA review or acceptance.

Related Articles