
Back

knowledge base

Company Information & Reporting

Company Information

The Company Information page provides a read-only overview of the organisation details registered within Workbloom. This information is collected during onboarding and is used for account administration, billing, reporting, and compliance purposes.

Administrators can review company records to verify that organisational information is accurate and up to date.
Step-by-Step Instructions

  • View Company Information

  1. Sign in to your Workbloom account.  
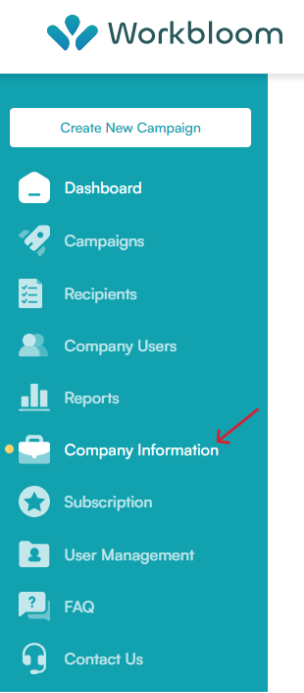
  1. Navigate to Company Information.  
Workbloom sidebar with a red arrow pointing to Company Information

  1. Review the company details displayed on the page.  
  1. Verify that the information accurately reflects your organisation.  

The Company Information page is available for reference and cannot be edited directly within the platform.

Tips

  • Review company information periodically for accuracy.
  • Verify contact information used for account administration and billing.
  • Ensure organisational records remain consistent with official company documentation.

Common Mistakes

  • Assuming company information can be edited directly within Workbloom.
  • Overlooking outdated company contact details.
  • Confusing company profile information with subscription billing information.

Related Articles

The Company Information page contains core organisational information provided during onboarding.

Company profile details may include:

  • Registered Business Legal Name
  • Trading Name (DBA)
  • Business Address Information
  • Country
  • Invoicing Currency
  • Tax ID / Company Registration Number
  • Company Website

This information is used to identify the organisation and support account administration and billing processes.

Tips

  • Review legal business information regularly.
  • Ensure tax and registration details remain accurate.
  • Verify that the company website information reflects your organisation.

Common Mistakes

  • Assuming onboarding information updates automatically.
  • Failing to review legal company details after organisational changes.
  • Overlooking incorrect registration information.

Related Articles

The Company Information page also displays the primary contact details associated with the organisation.

Information may include:

  • Client Contact First Name
  • Client Contact Last Name
  • Client Contact Email Address
  • Client Contact Phone Number

These details are used for account-related communication, onboarding activities, billing correspondence, and administrative notifications.

Tips

  • Ensure primary contact details remain current.
  • Use monitored email addresses for important communications.
  • Review contact information after personnel changes.

Common Mistakes

  • Allowing outdated contact information to remain on file.
  • Using inactive email addresses.
  • Failing to notify Workbloom when key contacts change.

Related Articles

Workbloom stores additional organisational information to help classify accounts and support reporting and service administration.

Business classification information may include:

  • Industry
  • Employee Range
  • Annual Revenue Range

This information is collected during onboarding and helps Workbloom understand the organisation's profile and operational requirements.

Tips

  • Review business classification information periodically.
  • Notify Workbloom if significant organisational changes occur.
  • Ensure onboarding information accurately reflects the organisation.

Common Mistakes

  • Providing outdated organisational information.
  • Overlooking changes in company size or classification.
  • Assuming classification information updates automatically.

Related Articles

Reporting & Analytics

The Reports section provides visibility into reward activity, balances, spending, tax-related information, and outstanding funding obligations. Reports help administrators monitor program performance and review reward transactions across the organisation.
Step-by-Step Instructions

  • Access Reports

  1. Sign in to your Workbloom account.  
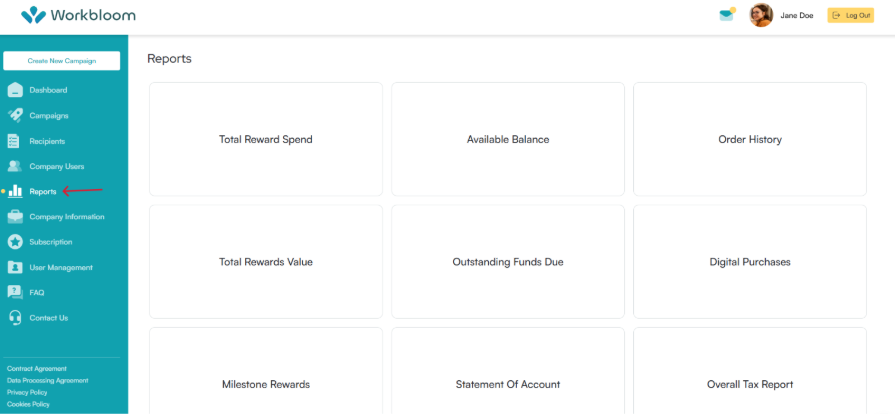
  1. Navigate to Reports.  
Reports page with a red arrow pointing to Reports in the sidebar

  1. Select the report you want to review.  

Available reports include*:

  • Total Reward Spend
  • Available Balance
  • Order History
  • Total Rewards Value
  • Outstanding Funds Due
  • Digital Purchases
  • Milestone Rewards
  • Statement of Account
  • Overall Tax Report

*Report availability depends on your subscription plan.

Tips

  • Review reports regularly to monitor programme activity.  
  • Use reports to track reward spending trends.  
  • Export reports when additional analysis is required.  

Common Mistakes

  • Assuming all reports update instantly.  
  • Reviewing reports without applying relevant filters where available.  
  • Ignoring outstanding balance or funding information.  
  • Assuming all reports are available on every subscription plan. Access to reports and reporting features may vary depending on the active subscription tier.

Related Articles

Workbloom provides different reporting capabilities depending on the organisation's subscription plan. Reports help administrators monitor reward activity, spending, balances, orders, and compliance-related information.

Report Availability by Subscription Plan

  • Essentials

The Reports menu is not available under the Essentials plan.

You only have access to the Dashboard Summary Reports and Campaign Reports, but they won't be available to download.

  • Elevate (Advanced Reporting)

The following reports are available:

  • Total Reward Spend
  • Available Balance
  • Order History
  • Total Rewards Value
  • Outstanding Funds Due
  • Digital Purchases
  • Milestone Rewards
  • Statement of Account

  • Amplify (Advanced + Tax Compliance Reporting)

Includes all reports available in the Elevate plan, plus:

  • Overall Tax Report

Report Descriptions

  • Total Reward Spend

Displays cumulative reward expenditure across campaigns and reward programmes.

  • Available Balance

Shows the current available balance that can be used for funding reward campaigns.

  • Order History

Displays historical reward order activity and transaction records.

  • Total Rewards Value

Displays the total value of rewards issued through the platform.

  • Outstanding Funds Due

Provides visibility into funding amounts that remain unpaid or outstanding.

  • Digital Purchases

Displays information relating to digital vouchers and prepaid cards from quick (one-off) campaigns, excluding milestone rewards.

  • Milestone Rewards

Provides reporting related to recurring milestone-based campaigns (work anniversary and birthdays) and issued rewards by type.

  • Statement of Account

Provides account-level financial reporting and transaction summaries.

  • Overall Tax Report

Provides tax-related reporting information by recipient and country.

Tips

  • Review available reports regularly to monitor reward programme performance.
  • Use financial reports to track spending and funding activity.
  • Review tax and account reports periodically for compliance and reconciliation purposes.
  • Verify which reports are included in your subscription plan.

Common Mistakes

  • Assuming all reports are available in every subscription plan.
  • Assuming the Reports menu is available on the Essentials plan.
  • Using the wrong report when searching for specific information.
  • Assuming all reports contain the same data fields.
  • Overlooking available balance information before funding rewards.

Related Articles

Reports display information in a tabular format that can be reviewed directly within the Workbloom platform.

Step-by-Step Instructions

  • Open a Report

  1. Navigate to Reports.  
  1. Select the desired report.  
  1. Review the information displayed within the report table.  

Depending on the report, information may include:
  • Recipient information  
  • Reward values  
  • Transaction counts  
  • Country information  
  • Tax reporting data  
  • Funding balances  

  • Navigate Through Results

  1. Use the pagination controls located below the report table.  
  1. Move between pages when reviewing larger data sets.  
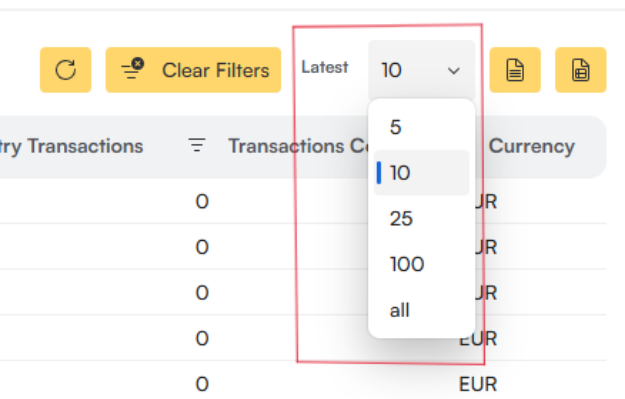
  1. If you don’t see all results, try changing how many data points are displayed.
Report table toolbar with a red box around the Latest dropdown open

Tips

  • Review report columns carefully before exporting data.  
  • Use pagination controls to navigate large reports.  
  • Verify filters before analysing report results.  

Common Mistakes

  • Reviewing incomplete data due to pagination.  
  • Misinterpreting report columns.  
  • Assuming all report types contain the same information.  

Related Articles

Reports may provide filtering capabilities that help administrators focus on specific data sets and improve report analysis.

Step-by-Step Instructions

  • Use Available Filters

  1. Open the desired report.  
  1. Review any available filtering options.  
  1. Apply the appropriate filter criteria.  
  1. Review the updated report results.  

Available filters vary depending on the report type and the information being displayed.

  • Clear Applied Filters

  1. Locate the filter controls.  
  1. Remove individual filters or use the available clear filter option.  
  1. Review the report results after filters have been removed.  

Tips

  • Use filters to focus on the most relevant information.  
  • Review active filters when analysing report data.  
  • Clear filters when returning to a broader view of report results.  

Common Mistakes

  • Forgetting that filters remain active while reviewing data.  
  • Concluding incomplete filtered results.  
  • Overlooking active filters when comparing report information.  
  • Assuming all reports provide the same filtering options.  

Related Articles

Report data can be exported for offline analysis and record keeping.
Step-by-Step Instructions

  • Export Report Data

  1. Open the desired report.  
  1. Review any applied filters.  
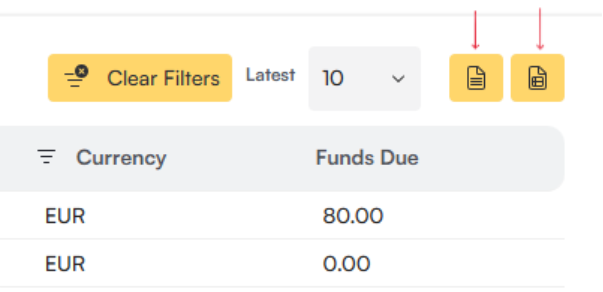
  1. Select the export option.  
  1. Choose the required format.  
Report table toolbar with two red arrows pointing to two export buttons

Available export formats include:

  • Microsoft Excel (.xlsx)  
  • CSV (.csv)  

  1. Download the generated file.  

Tips

  • Apply filters before exporting.  
  • Retain exported reports for audit and reporting purposes.  
  • Verify exported data matches the selected report view.  

Common Mistakes

  • Exporting incorrect reporting periods.  
  • Forgetting to apply required filters.  
  • Assuming exports automatically refresh report data.  

Related Articles

The Overall Tax Report provides visibility into reward activity that may be relevant to tax reporting and compliance.

  • Information Available

Depending on configuration and activity, the report may include:

  • Recipient identifiers  
  • Recipient names  
  • Email addresses  
  • Country information  
  • Tax-free country total amount
  • Total reward amount
  • Tax-free country transactions
  • Transactions count by recipient
  • Currency information  

The report may also display visual indicators when reporting thresholds are approached or exceeded.
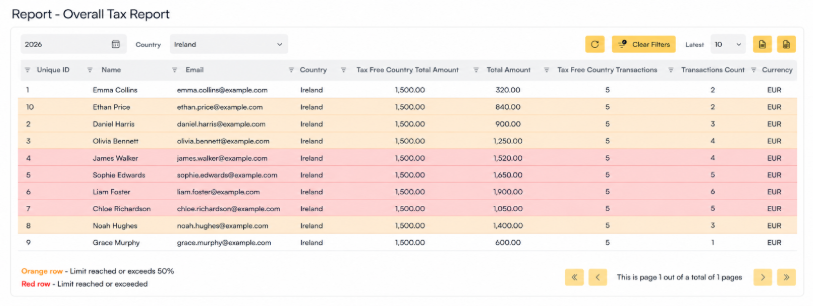
Workbloom overall tax report showing tax free country limitations, amounts and transactions per recipient

Tips

  • Review tax reports regularly.  
  • Monitor reporting thresholds where applicable.  
  • Export reports when additional analysis is required.  

Common Mistakes

  • Assuming tax reports replace formal tax advice.  
  • Ignoring threshold indicators.  
  • Failing to review country-specific reporting information.  

Related Articles

If the report information appears incomplete or inaccurate, several checks can help identify the issue.

Troubleshooting Steps

  • No Data Displayed

  • Verify that transactions exist for the selected period.  
  • Check active report filters.  
  • Refresh the report.  

  • Missing Recipients or Transactions

  • Confirm that recipients have received rewards.  
  • Verify campaign activity has been processed.  
  • Check how many data points are selected.
  • Refresh report information.  

  • Unexpected Results

  • Review filter selections.  
  • Confirm the correct report type is being viewed.  
  • Export data for further analysis if necessary.  

Tips

  • Refresh reports before reporting issues.  
  • Verify filters before contacting support.  
  • Review campaign activity when investigating missing transactions.  

Common Mistakes

  • Assuming missing data indicates a system issue.  
  • Forgetting to clear report filters.  
  • Reviewing the wrong report type.  

Related Articles