Back

knowledge base

Campaigns

Campaign Types

Campaigns are used to distribute rewards to recipients. Workbloom supports both one-time (quick) and automated reward campaigns, allowing organisations to recognise employees for achievements, milestones, and special occasions.

When creating a campaign, users progress through a guided setup process that includes campaign configuration, recipient selection, reward selection, and review before activation.
Step-by-Step Instructions

  • Create a New Campaign

  1. Sign in to your Workbloom account.  
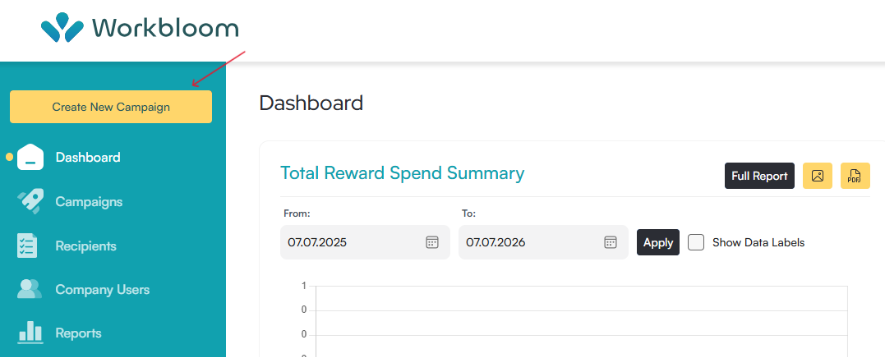
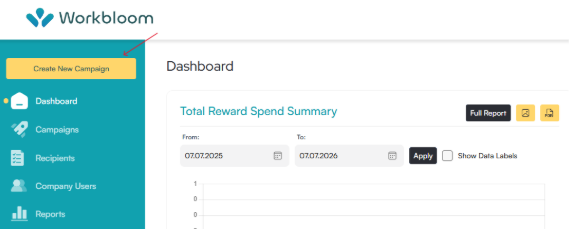
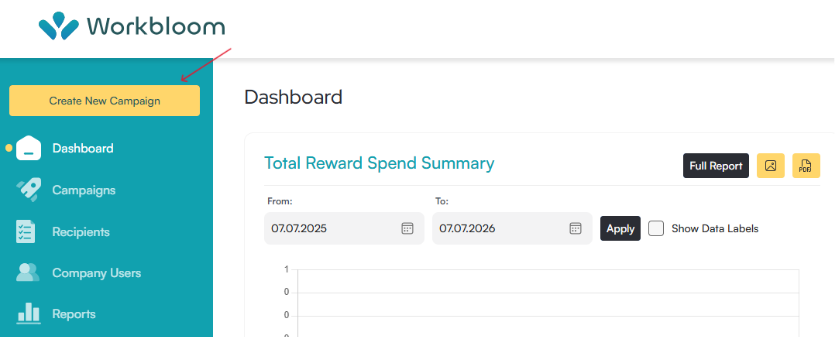
  1. Select Create New Campaign.  
Workbloom dashboard with a red arrow pointing to the Create New Campaign button in the sidebar

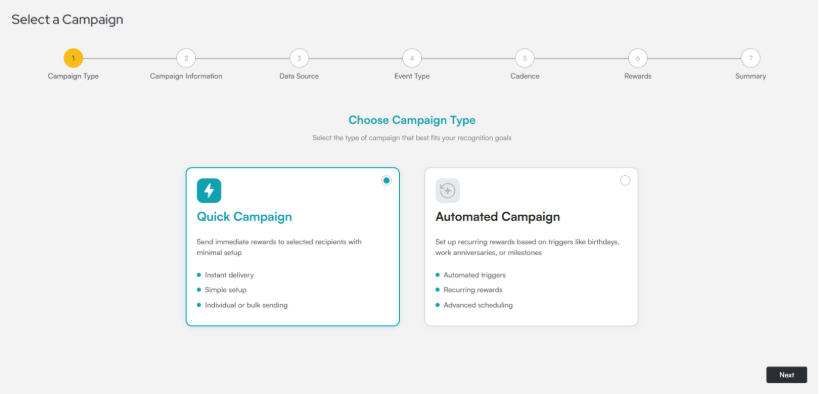
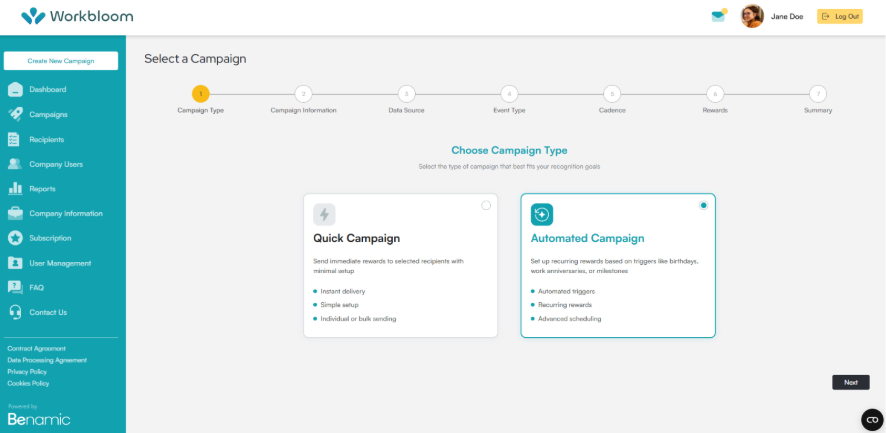
  1. Choose the campaign type:  

  • Quick Campaign  
  • Automated Campaign  
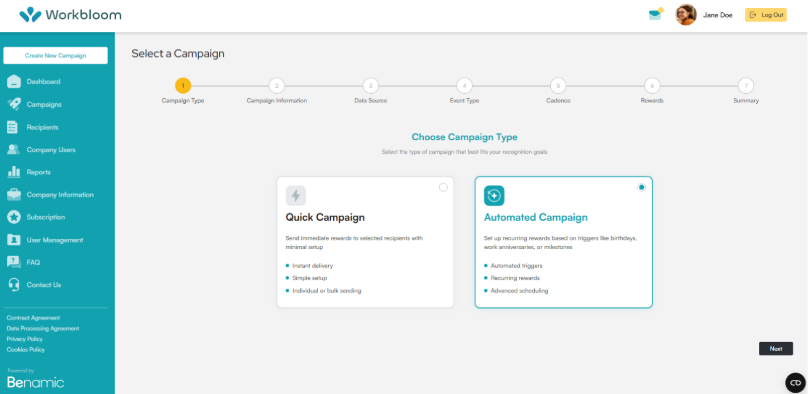
Select a Campaign flow on step 1 of 7, Campaign Type, showing two options: Quick Campaign and Automated Campaign

  1. Select Next.  
  1. Complete each stage of the campaign setup process.  
  1. Review the campaign summary.  
  1. Confirm and activate the campaign.  

  • Campaign Setup Stages

The campaign creation process may include:

  • Campaign Type  
  • Campaign Information  
  • Data Source  
  • Event Type  
  • Cadence  
  • Rewards  
  • Summary  

The available configuration options may vary depending on the selected campaign type.

Tips

  • Select the campaign type that best matches your reward programme requirements.  
  • Review all campaign settings before activation.  
  • Confirm recipient and reward information to avoid delivery issues.  

Common Mistakes

  • Selecting the wrong campaign type.  
  • Activating a campaign before reviewing all settings.  
  • Using incorrect recipient data.  

Related Articles

Quick Campaigns are designed for immediate reward distribution with minimal setup. They are typically used when rewards need to be sent to selected recipients without requiring recurring schedules or automated triggers.

Quick Campaigns support both individual and bulk reward distribution.

When to Use a Quick Campaign

Quick Campaigns are suitable for:
  • Milestone moments (promotions, project completions or personal achievements)  
  • Spot awards  
  • Performance incentives  
  • One-time reward distributions  
  • Immediate reward delivery  

Step-by-Step Instructions

  • Create a Quick Campaign

  1. From the Workbloom Dashboard, Select Create New Campaign.  
Workbloom dashboard with a red arrow pointing to the Create New Campaign button in the sidebar

  1. Choose Quick Campaign.  
Select a Campaign flow on step 1 of 7, Campaign Type, showing two options: Quick Campaign, currently selected, and Automated Campaign

  1. Select Next.  
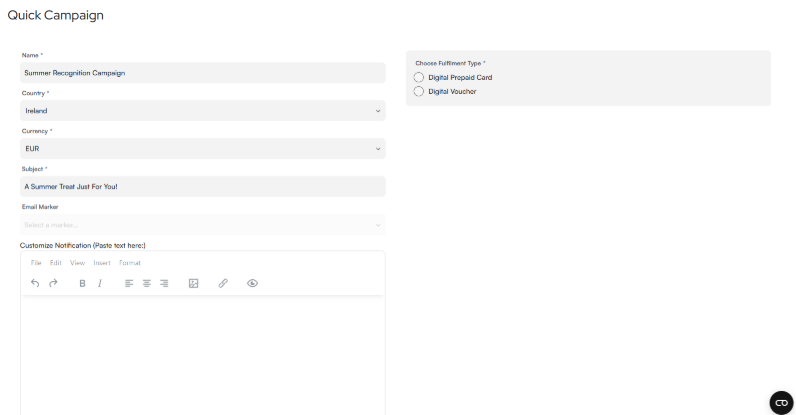
  1. Complete the required campaign setup information.  
Workbloom Quick Campaign setup form

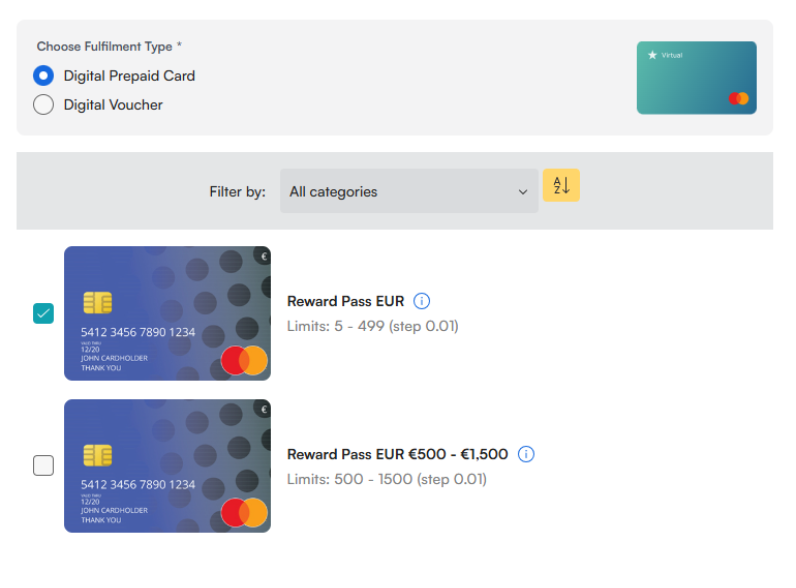
  1. Choose the reward type.  
Workbloom Quick campaign Choose Fulfilment Type form

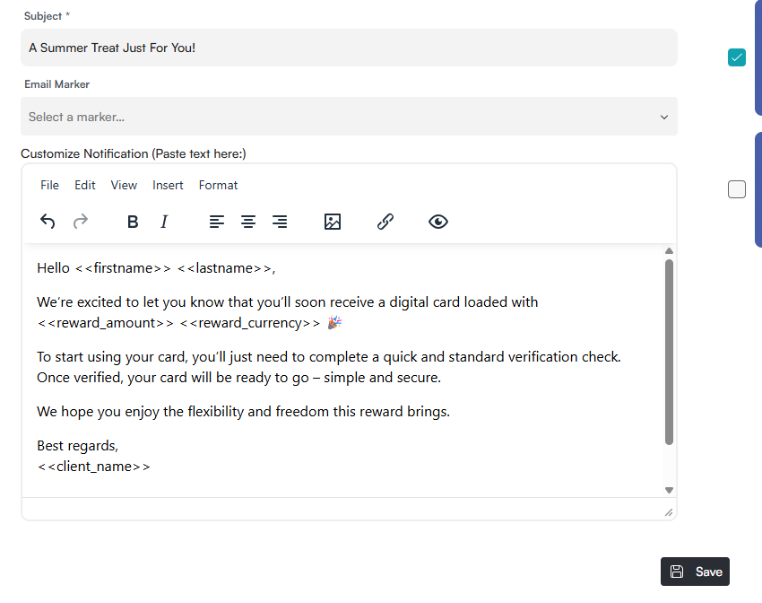
  1. Customise the email that the recipient will receive.
Customize Notification editor with a sample email

  1. Click Save.
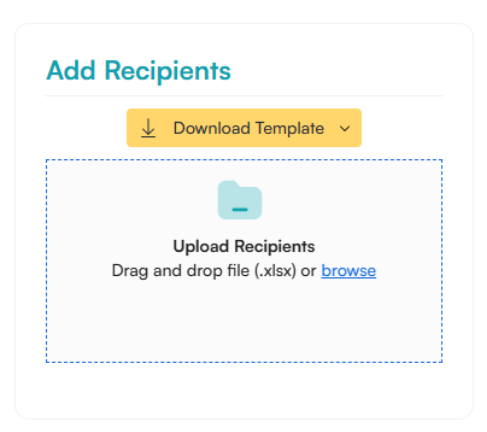
  1. Add Recipients (manual upload using Excel template).
Add Recipients panel with a Download Template button

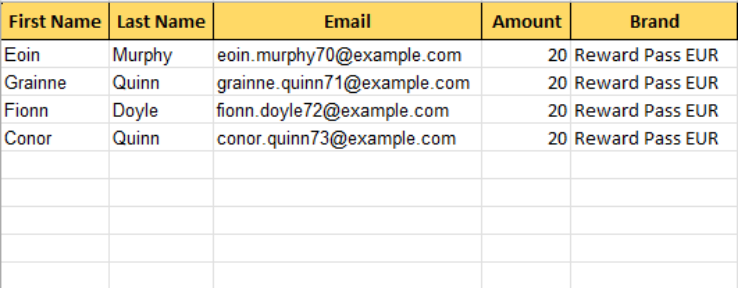
  1. Fill in the recipients' details and the reward amount
Excel template example with columns for First Name, Last Name, Email, Amount, and Brand, populated with sample recipient data

  1. Upload the completed file
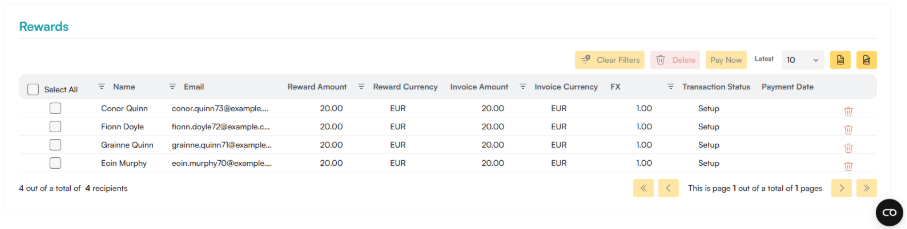
  1. Confirm the uploaded recipients list
Rewards table showing four uploaded recipients on Workbloom

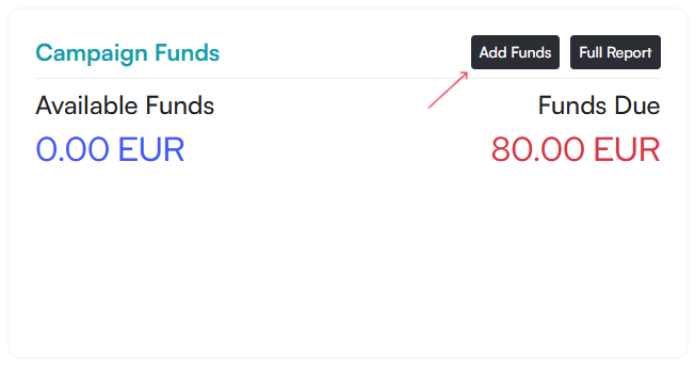
  1. Add funds for your campaign

Campaign Funds panel with a red arrow pointing to the Add Funds button

  1. Review all campaign details, and you’re done!

Rewards will be delivered according to the campaign configuration after funds are successfully received.

Tips

  • Use Quick Campaigns for immediate recognition initiatives.  
  • Verify recipient information before sending rewards.  
  • Review reward values carefully before activation.  

Common Mistakes

  • Using a Quick Campaign for recurring events.  
  • Selecting incorrect recipients.  
  • Activating the campaign without reviewing reward details.  

Related Articles

Automated Campaigns allow organisations to automatically distribute rewards based on predefined events and schedules. These campaigns help streamline employee recognition programmes by reducing manual administration.

Automated Campaigns can be configured for recurring events such as birthdays, work anniversaries, and other milestones.

When to Use an Automated Campaign

Automated Campaigns are suitable for:
  • Employee birthdays  
  • Work anniversaries  
  • Holiday & Seasonal rewards 
  • Recurring recognition programmes  
  • Scheduled reward distributions  

Step-by-Step Instructions

  • Create an Automated Campaign

  1. Select Create New Campaign.  

  1. Choose Automated Campaign.  

  1. Select Next.  
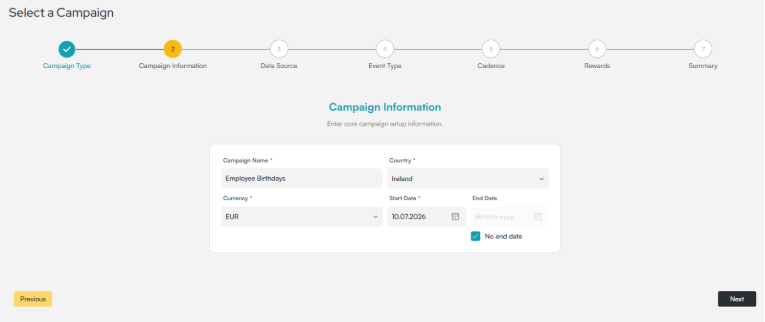
  1. Configure the campaign information.  
Select a Campaign flow on step 2 of 7, Campaign Information, with fields for Campaign Name, Country, Currency, Start Date, and End Date

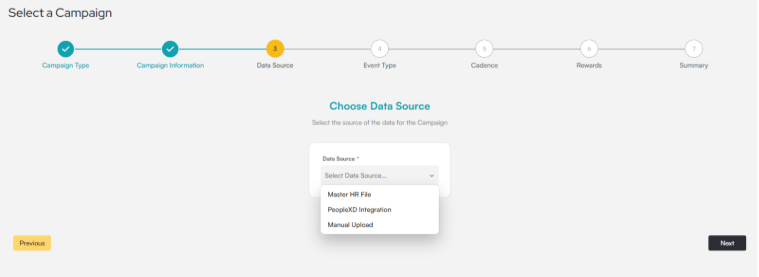
  1. Select a data source.  
Select a Campaign flow on step 3 of 7, Data Source, with an open Data Source dropdown showing three options: Master HR File, PeopleXD Integration, and Manual Upload

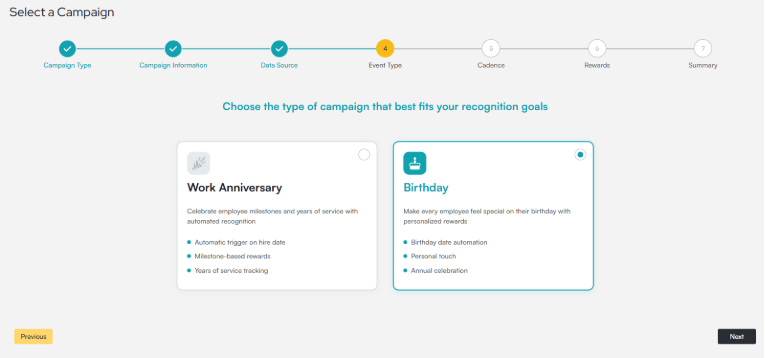
  1. Choose the event type.  
Select a Campaign flow on step 4 of 7, Event Type, showing two options: Work Anniversary and Birthday

  1. Configure the campaign cadence.  
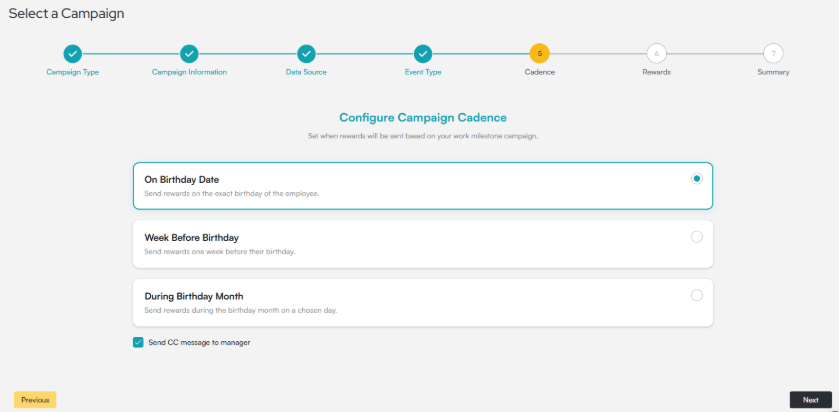
Select a Campaign flow on step 5 of 7, Cadence, showing three timing options: On Birthday Date, Week Before Birthday and During Birthday Month

  1. Select the fulfilment method and/or reward type.

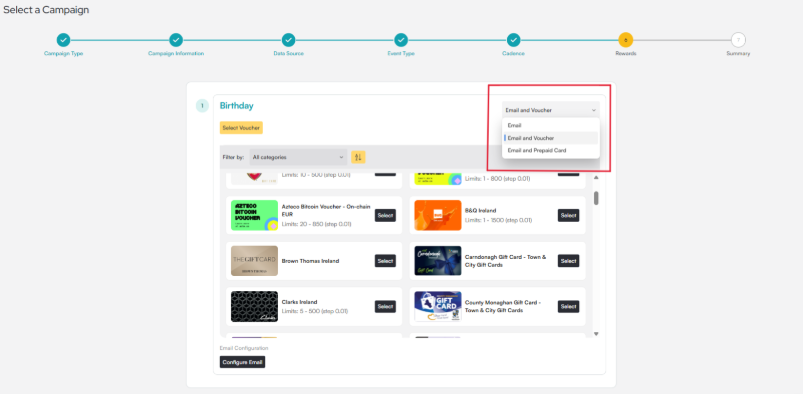
Select a Campaign wizard on step 6 of 7, Rewards with three options: Email, Email and Voucher, Email and Prepaid Card

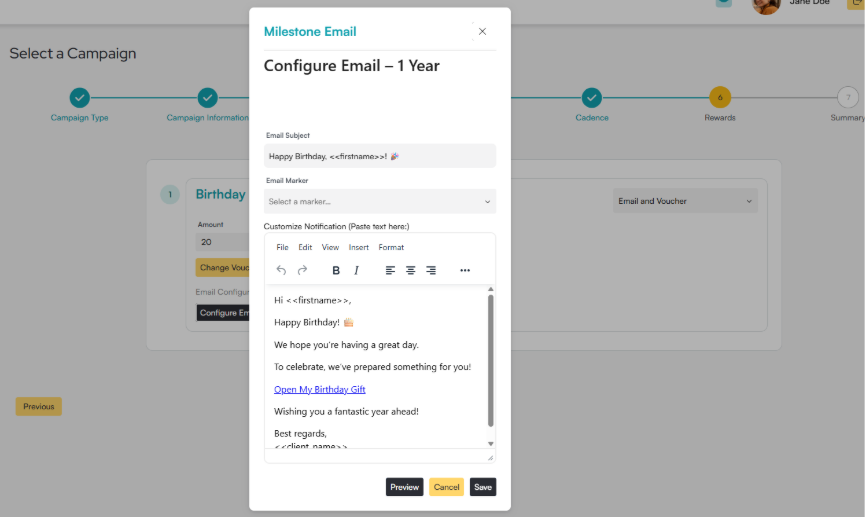
  1. Configure reward amount and email.
Workbloom Milestone Email dialog

  1. Review the campaign summary.  
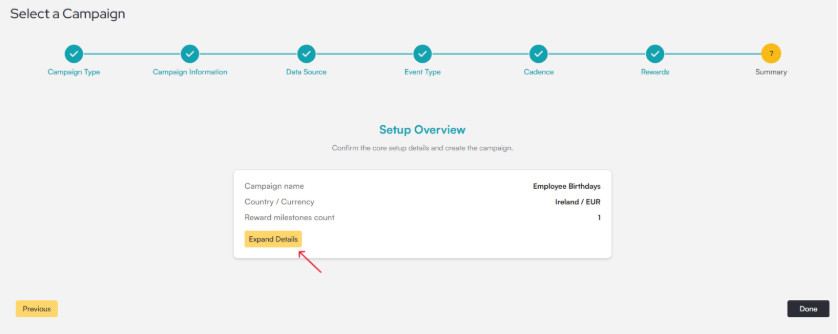
Select a Campaign flow on step 7 of 7, Summary, with a Setup Overview and Expand Details button

  1. When you’re finished with the setup, click Done.
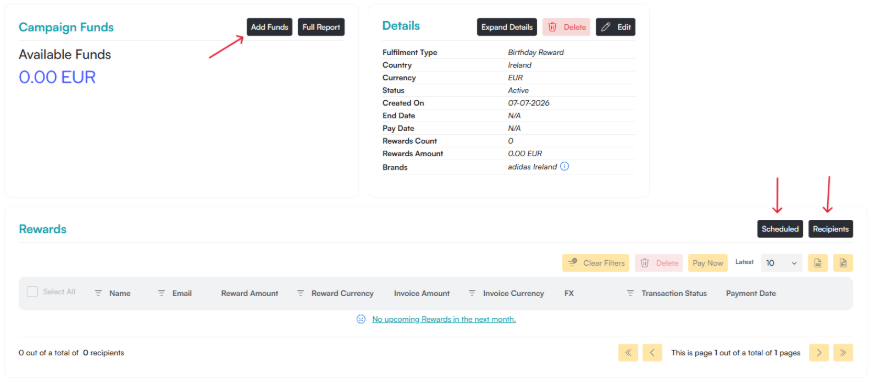
  1. In the Campaign menu, you can Add Funds, See Scheduled Rewards and Review Recipients.

Campaign page with Campaign Funds and Details panels, a red arrow pointing to the Add Funds button, and two red arrows pointing to Scheduled and Recipients view toggles above the Rewards table

Once funds are received successfully, eligible recipients will receive rewards based on the configured campaign rules.

Tips

  • Verify recipient data before enabling automated campaigns.  
  • Review campaign schedules regularly.  
  • Ensure reward budgets align with expected campaign volume.  

Common Mistakes

  • Selecting an incorrect event trigger.  
  • Using outdated recipient data.  
  • Forgetting to review campaign schedules after organisational changes.  

Related Articles

Campaign Configuration

Campaign Information defines the basic details of a campaign and helps identify its purpose within the Workbloom platform. It is configured during the campaign creation process and is used to distinguish campaigns from one another.

Step-by-Step Instructions

  • Configure Campaign Information

  1. Create a new campaign.  
  1. Complete the Campaign Type step.  
  1. Proceed to the Campaign Information step.  
  1. Enter the required campaign details.  
  1. Review the information for accuracy.  
  1. Select Next to continue.  

Campaign information may include:

  • Campaign name  
  • Country
  • Currency
  • Start Date
  • End Date  

The available fields may vary depending on the selected campaign type.

Tips

  • Use clear and descriptive campaign names.
  • Include naming conventions that support reporting and administration.
  • Review campaign details before proceeding to the next step.

Common Mistakes

  • Using generic campaign names.
  • Creating multiple campaigns with similar names.
  • Entering inaccurate campaign information.

Related Articles

The Data Source determines where recipient information is obtained for a campaign. Workbloom supports both manually uploaded recipient data and integrated HR data sources.

Step-by-Step Instructions

  • Select a Data Source

  1. Proceed to the Data Source step during campaign creation.  
  1. Review the available data sources.  
  1. Select the appropriate source.  
  1. Confirm that recipient data is available.  
  1. Continue to the next step.  

Available data sources may include:

  • Recipient lists uploaded through Master HR file (automated campaigns)
  • HR system integrations, such as PeopleXD (automated campaigns)
  • Manual upload with Excel file (automated and quick campaigns)

The available options depend on your organisation's configuration.

Tips

  • Verify recipient data before campaign activation.
  • Ensure HR integrations have been refreshed recently.
  • Use the most current recipient source available.

Common Mistakes

  • Selecting an outdated recipient source.
  • Using incomplete recipient data.
  • Failing to refresh integrated HR data before campaign creation.

Related Articles

Event Types determine when rewards should be issued within an Automated Campaign. Event-driven campaigns allow organisations to automate reward delivery based on employee milestones and predefined triggers.

Step-by-Step Instructions

  • Configure an Event Type

  1. Create an Automated Campaign.  
  1. Navigate to the Event Type step.  
  1. Select the appropriate event.  
  1. Review the event configuration.  
  1. Continue to the next step.  

Event types may include:

  • Birthdays
  • Work anniversaries
  • Service milestones
  • Other configured recognition events

Available event types depend on platform configuration.

Tips

  • Confirm employee data contains the information required for the selected event.
  • Review event settings before activation.
  • Test campaign configurations before large-scale deployment.

Common Mistakes

  • Selecting the wrong event trigger.
  • Using incomplete employee data.
  • Activating campaigns without validating event conditions.

Related Articles

Campaign Cadence determines the reward distribution date for automated campaigns, but it does not control how often the campaign runs.

Step-by-Step Instructions

  • Configure Campaign Cadence

  1. Proceed to the Cadence step.  
  1. Review the available scheduling options:

On Milestone / Birthday Date - Send rewards on the exact milestone of their hire date or the exact birthday of the employee.

Week Before Milestone / Birthday - Send rewards one week before their milestone or one week before their birthday.

During Milestone / Birthday Month - Send rewards during the milestone month or the birthday month on a chosen day.  

  1. Confirm the schedule.  
  1. Continue to reward configuration.  

Cadence options may vary depending on the selected campaign type and event trigger.

Tips

  • Align campaign schedules with organisational recognition programmes.
  • Review cadence settings periodically.
  • Confirm reward budgets support recurring campaigns.

Common Mistakes

  • Configuring schedules that run more frequently than intended.
  • Forgetting to review recurring campaign schedules.
  • Activating campaigns without validating cadence settings.

Related Articles

Rewards

Rewards determine how recipients receive recognition through a campaign. During campaign setup, administrators can configure the reward delivery method and select the appropriate reward option. Depending on account configuration and campaign settings, rewards may be delivered as vouchers, prepaid cards, or email notifications.

Step-by-Step Instructions

  • Configure Reward Delivery

  1. Proceed to the Rewards step during campaign creation.  
  1. Select the reward milestone you want to configure.  
  1. Choose a delivery method.  
  1. Configure the reward value.  
  1. Select the reward option.  
  1. Save the configuration.  
  1. Repeat the process for additional milestones if required.  

  • Available Delivery Methods

The available delivery methods may include:

  • Email
  • Email and Voucher
  • Email and Prepaid Card

Available options may vary depending on account status, country, and reward availability.

Tips

  • Select the delivery method that best matches your recognition programme.
  • Verify reward availability before activating a campaign.
  • Review all reward settings before proceeding to the Summary step.

Common Mistakes

  • Selecting the wrong delivery method.
  • Forgetting to save reward changes.
  • Configuring rewards that are not available in the selected country.

Related Articles

Digital vouchers allow recipients to redeem rewards through participating voucher providers and merchants. Voucher availability may vary depending on country, currency, and campaign configuration.
Step-by-Step Instructions

  • Select a Voucher Reward

  1. Navigate to the Rewards step.  
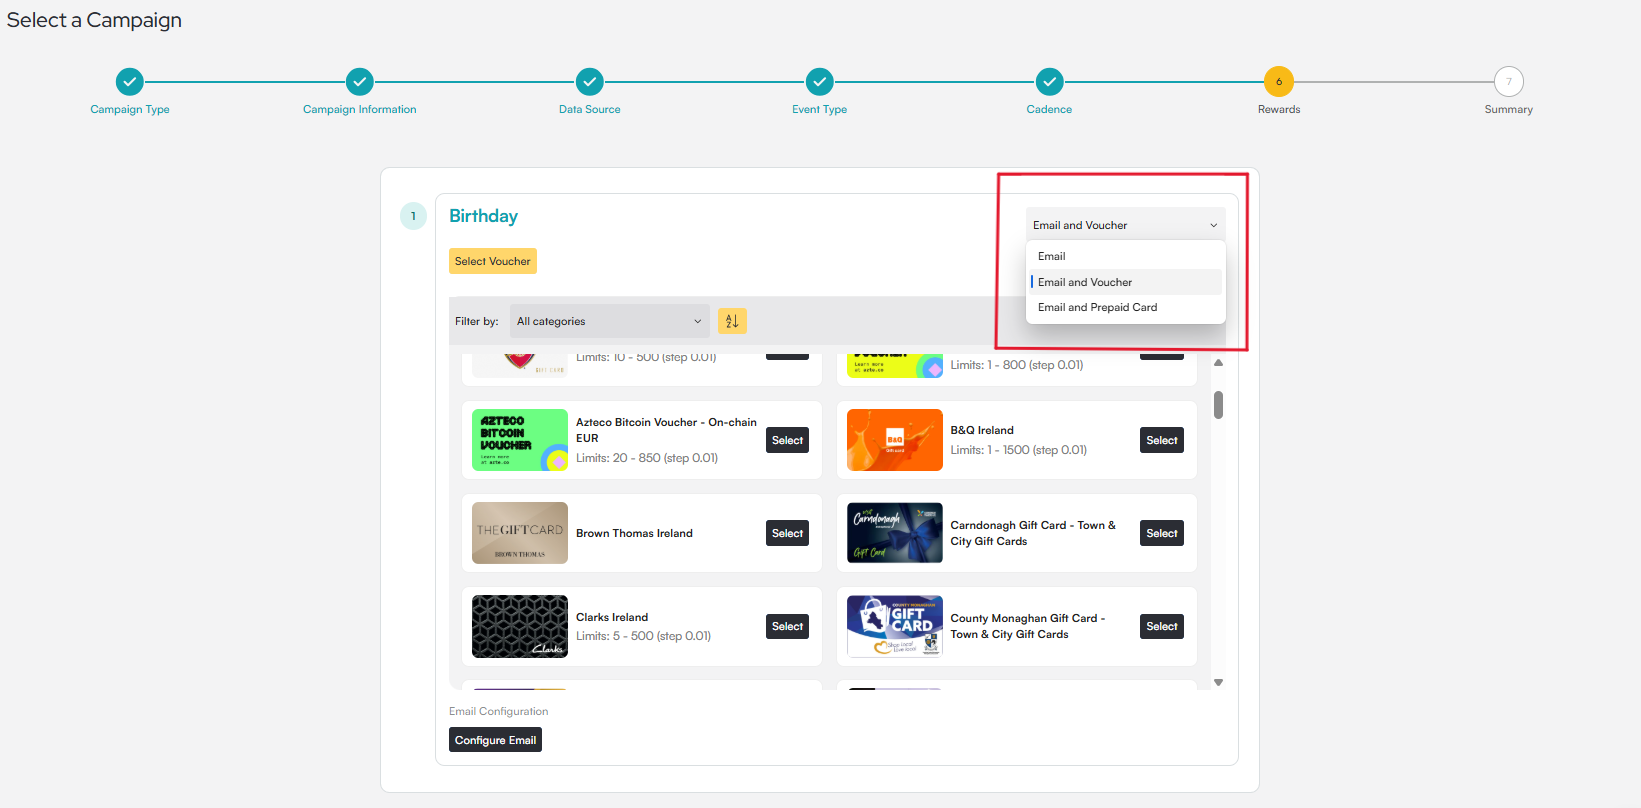
  1. Select Email and Voucher as the delivery method.
  1. Browse available voucher options.  
Select a Campaign flow on step 6 of 7, Rewards, with a red box around an open dropdown set to Email and Voucher and a list of available vouchers
  1. Select the desired voucher.  
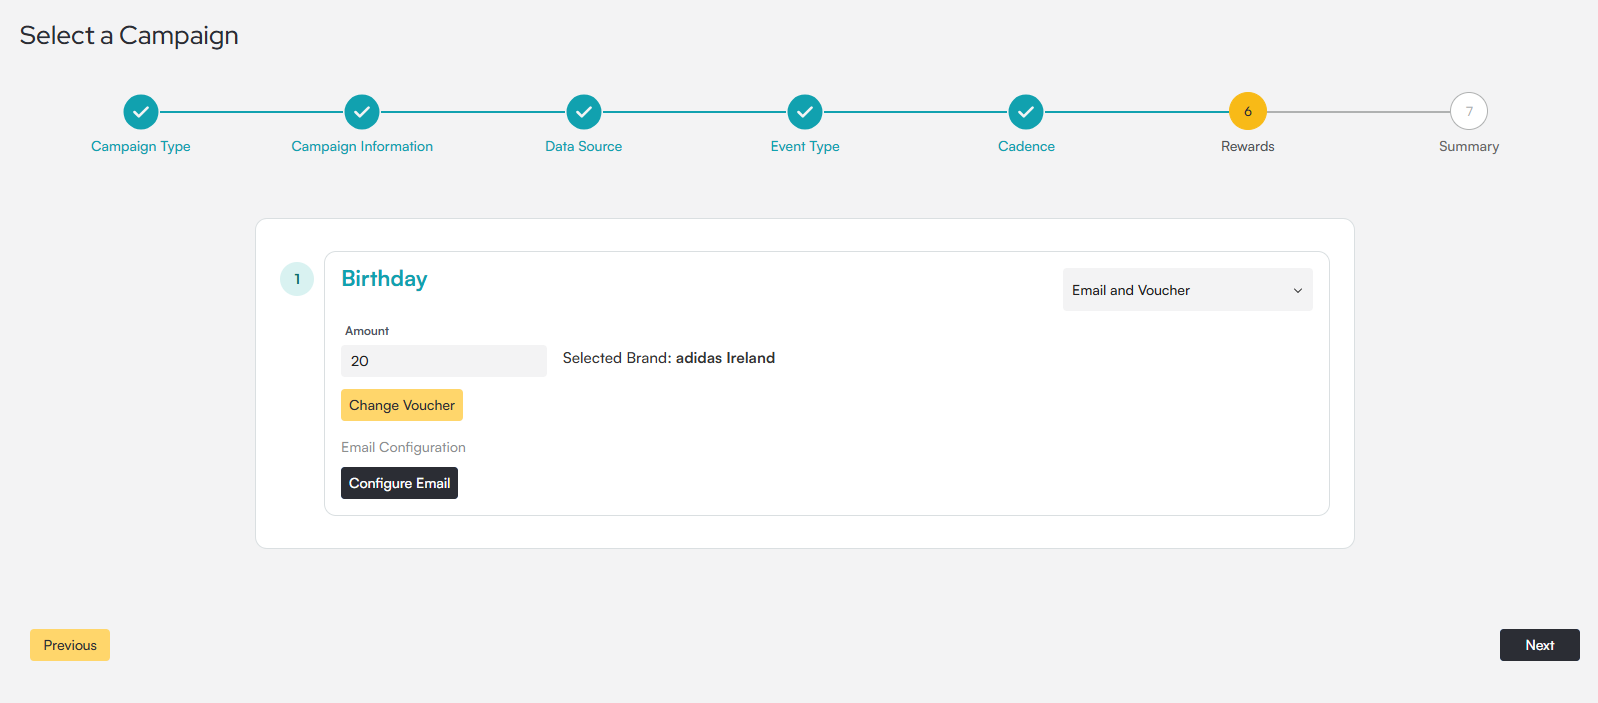
  1. Configure the reward value.  
Select a Campaign flow on step 6 of 7, Rewards, set to Email and Voucher, with an Amount field
  1. Save the reward settings.  

Recipients will receive instructions for voucher redemption according to the selected delivery method.

Tips

  • Confirm voucher availability in the recipient's country.
  • Review redemption conditions before activation.
  • Verify reward values before saving.

Common Mistakes

  • Selecting vouchers unavailable in the recipient's region.
  • Using incorrect reward values.
  • Forgetting to review voucher restrictions.

Related Articles

Digital prepaid cards provide recipients with a prepaid card balance that can be used according to the card programme rules. Availability of prepaid cards may depend on account verification requirements and supported countries.
Step-by-Step Instructions

  • Select a Prepaid Card Reward

  1. Navigate to the Rewards step.  
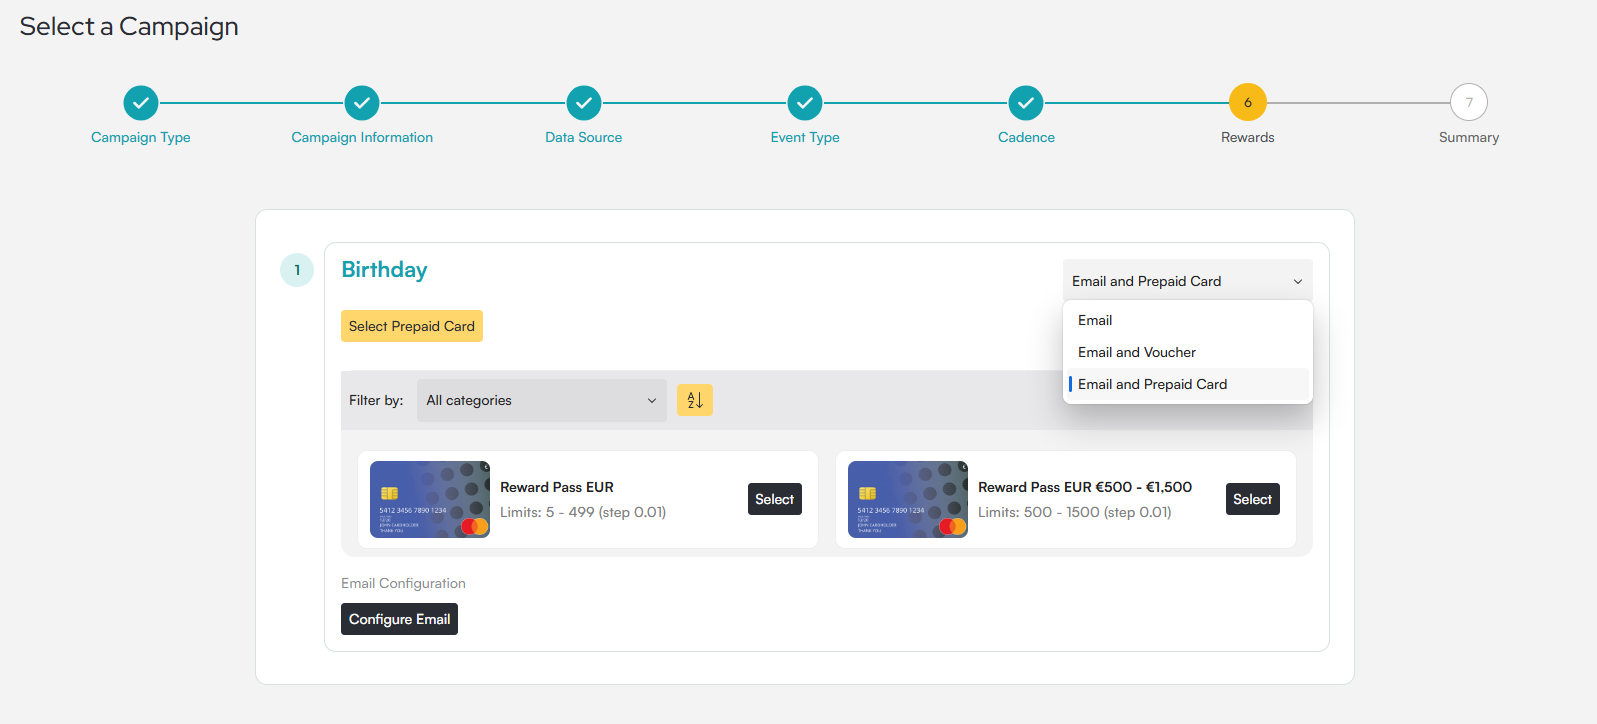
  1. Select Email and Prepaid Card as the delivery method.  
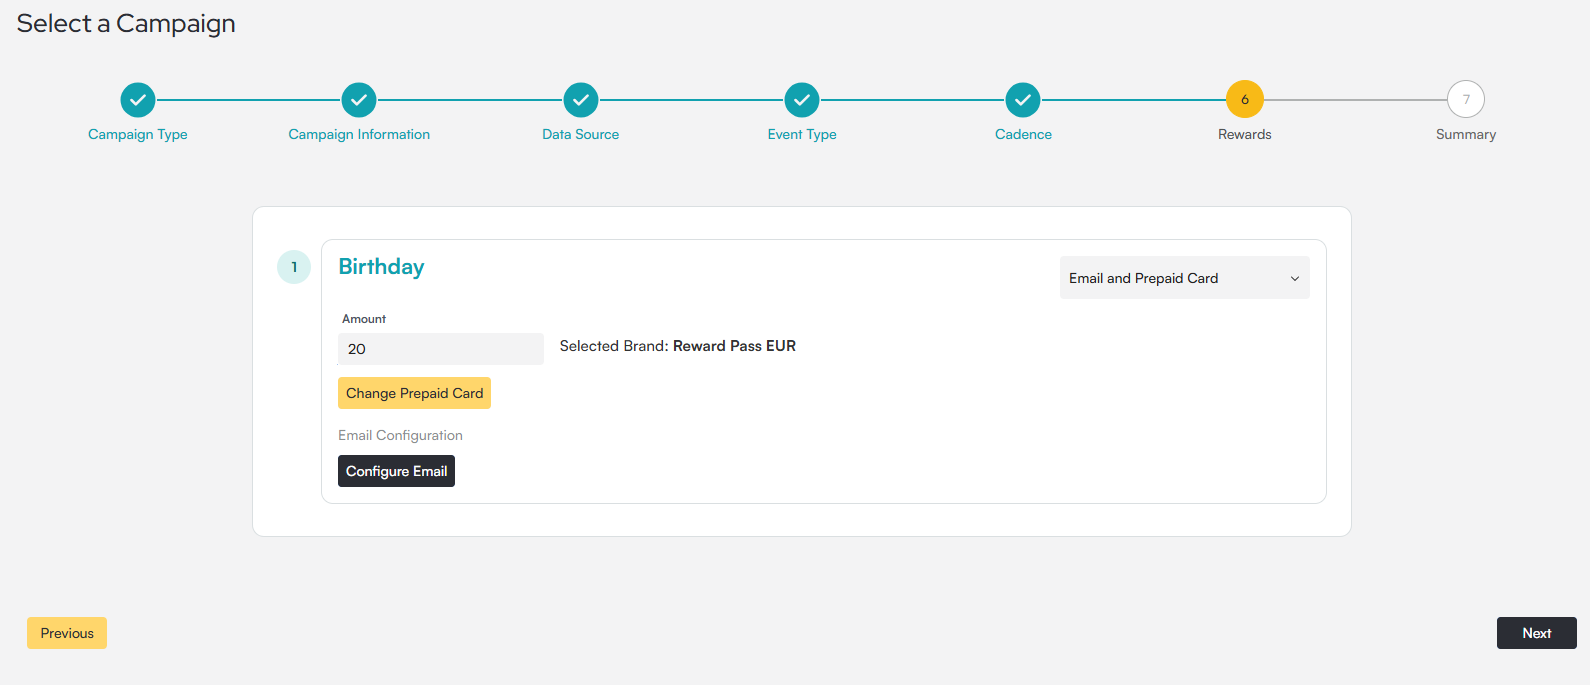
Select a Campaign flow on step 6 of 7, Rewards, with an open dropdown set to Email and Prepaid Card, showing prepaid card options
  1. Configure the reward value.  
Select a Campaign flow on step 6 of 7, Rewards, set to Email and Prepaid Card, with an Amount field
  1. Save the reward configuration.  
  1. Continue with campaign setup.  

Additional recipient verification requirements may apply depending on card provider regulations.

Tips

  • Verify that prepaid cards are enabled for your account.
  • Confirm country eligibility before campaign activation.
  • Review any recipient verification requirements.

Common Mistakes

  • Assuming prepaid cards are available for all accounts.
  • Selecting unsupported countries.
  • Ignoring verification requirements.

Related Articles

Reward values determine the amount associated with a voucher or prepaid card reward. The available reward range depends on the selected reward product and country configuration.

Step-by-Step Instructions

  • Configure Reward Values

  1. Open the reward configuration.  
  1. Enter the desired reward amount.  
  1. Verify that the amount falls within the permitted range.  
  1. Save the reward configuration.  

Some reward products display minimum and maximum values, along with supported increments.
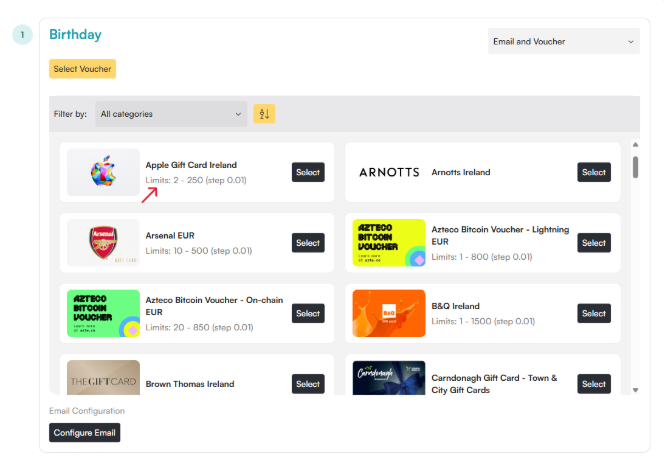
Workbloom reward selection screen with a red arrow showing reward limits, above a scrollable list of other voucher and gift card options

Tips

  • Verify reward budgets before campaign activation.
  • Review value limits for each reward product.
  • Ensure reward amounts align with company policies.

Common Mistakes

  • Entering values outside permitted limits.
  • Applying inconsistent reward amounts across campaigns.
  • Forgetting to review currency settings.

Related Articles

Campaign Summary

The Campaign Summary page provides a final overview of the campaign configuration before activation. Administrators should review all settings carefully to ensure the campaign has been configured correctly.
Step-by-Step Instructions

  • Review Campaign Summary

  1. Complete all campaign setup steps.  
  1. Navigate to the Summary step.  
  1. Review the campaign information.  
  1. Verify the selected country and currency.  
  1. Review reward configuration details.  
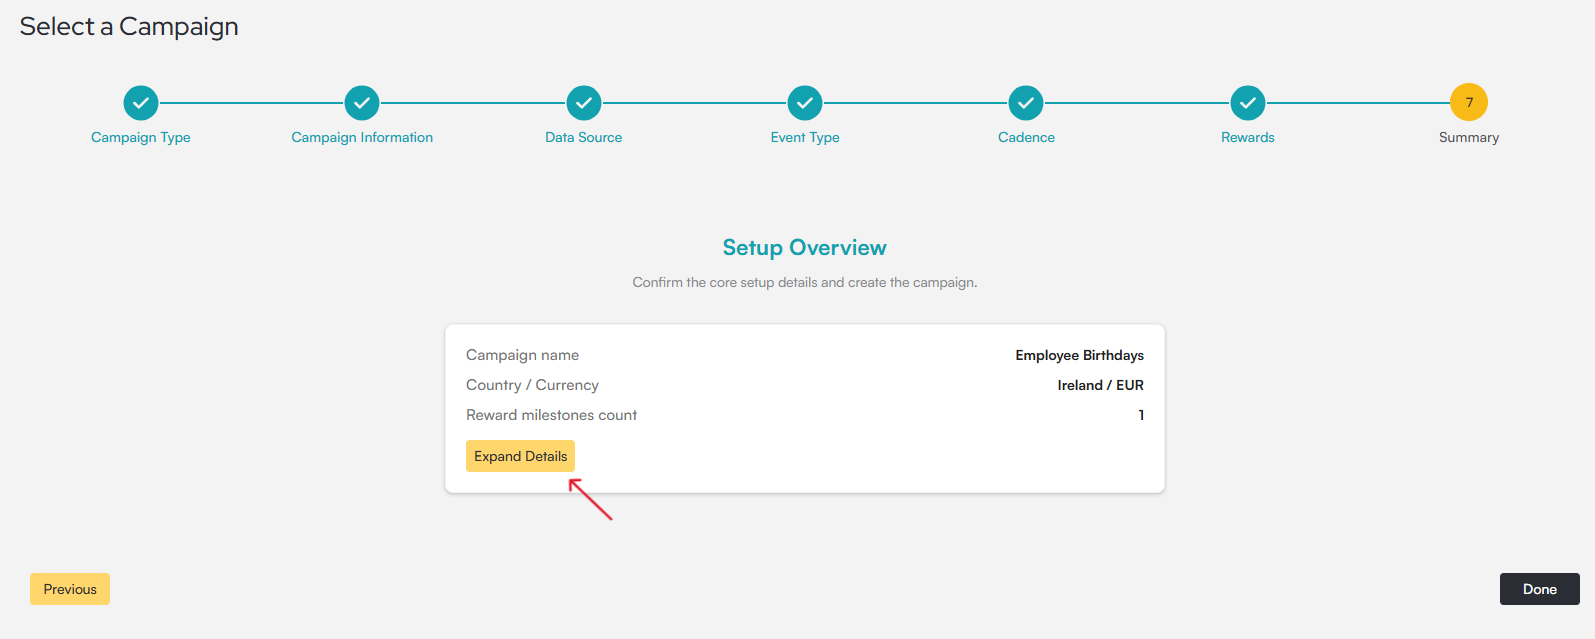
  1. Expand additional information if required.  
  1. Select Done to create the campaign.  

Select a Campaign flow on step 7 of 7, Summary, with a Setup Overview

  • Summary Information

The Summary page may display:

  • Campaign Name
  • Country and Currency
  • Reward Milestone Count
  • Reward Configuration Details
  • Campaign Settings

Tips

  • Review all campaign settings before activation.
  • Confirm reward values and delivery methods.
  • Verify country and currency selections.

Common Mistakes

  • Activating campaigns without reviewing the summary.
  • Overlooking incorrect reward settings.
  • Failing to validate campaign details before launch.

Related Articles

Campaign Lifecycle

Campaign statuses help administrators track the current state of a campaign throughout its lifecycle. The status indicates whether a campaign is being configured, scheduled, active, completed, or requires attention. Understanding campaign statuses helps users monitor campaign progress and identify any issues that may require action.

Common Campaign Statuses

Campaigns may move through the following stages:

  • Active

The campaign is currently processing or delivering rewards.

At this stage:

  • Reward distribution is in progress.
  • Recipient processing may still be occurring.
  • Reporting becomes available.

  • Closed

The campaign has finished processing all eligible recipients.

At this stage:

  • Reward distribution has been completed.
  • Reporting data is available.
  • Historical records remain accessible.

  • Failed

The campaign encountered an issue that prevented successful completion.

At this stage:

  • Some recipients may not have received rewards.
  • Administrative review may be required.
  • Error details may be available within campaign reporting.

Tips

  • Review campaign statuses regularly.
  • Investigate failed campaigns promptly.
  • Confirm scheduled campaigns before execution dates.

Common Mistakes

  • Assuming a scheduled campaign has already been delivered.
  • Ignoring failed campaign notifications.
  • Forgetting to review campaign results after completion.

Related Articles

Administrators may update campaign settings before a campaign has been completed. The ability to edit a campaign depends on its current status and configuration.
Step-by-Step Instructions

  • Edit a Campaign

  1. Navigate to Campaigns.  
  1. Locate the campaign you want to modify.  
  1. Open the campaign details.  
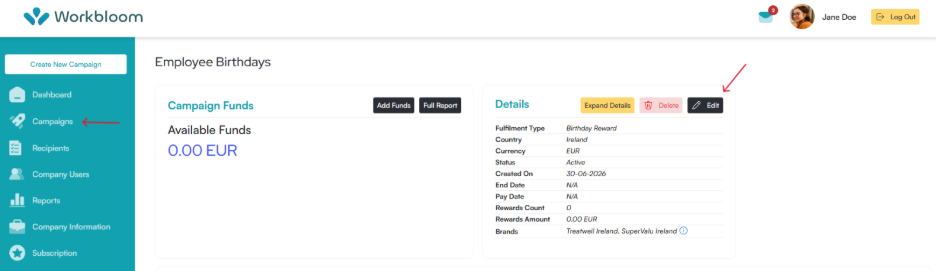
  1. Select Edit if available.  
  1. Update the required settings.  
  1. Save your changes.  
Workbloom Campaign page with a red arrow pointing to Campaigns in the sidebar, and a red arrow pointing to the Edit button in the Details panel

Editable settings may include:

  • Campaign information
  • Recipients
  • Reward settings
  • Scheduling options

Some active or completed campaigns may not allow editing.

Tips

  • Review all changes before saving.
  • Confirm recipient updates before activation.
  • Document significant campaign changes internally if required.

Common Mistakes

  • Modifying campaigns without reviewing the impact on recipients.
  • Changing reward settings after campaign approval.
  • Assuming all campaign statuses support editing.

Related Articles

Campaigns can be cancelled when reward distribution is no longer required or when configuration changes make the campaign obsolete. Cancellation availability depends on campaign status.
Step-by-Step Instructions

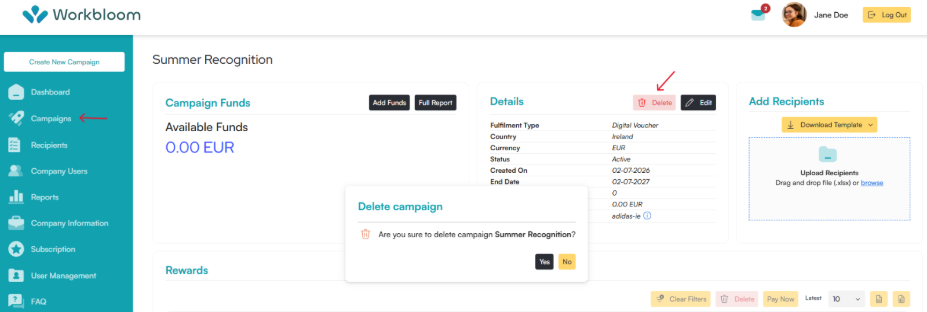
  • Cancel (Delete) a Campaign

  1. Navigate to Campaigns.  
  1. Open the campaign you want to cancel.  
  1. Select Delete if available.  
  1. Review the confirmation message.  
  1. Confirm the cancellation.  
Workbloom campaign page with a red arrow pointing to Campaigns in the sidebar and a red arrow pointing to the Delete button in the Details panel and a Delete campaign confirmation dialog

Cancelled (Deleted) campaigns will no longer process future reward distributions and cannot be restored.

Tips

  • Review campaign details before cancellation.
  • Inform relevant stakeholders when cancelling recurring campaigns.
  • Verify whether rewards have already been issued.

Common Mistakes

  • Cancelling the wrong campaign.
  • Assuming cancellation reverses previously delivered rewards.
  • Forgetting to notify campaign owners.

Related Articles

A campaign may fail when one or more issues prevent successful reward distribution or campaign execution. Failure reasons may include recipient data issues, reward configuration problems, payment limitations, or delivery errors.

Step-by-Step Instructions

  • Review a Failed Campaign

  1. Navigate to Campaigns.  
  1. Locate the failed campaign.  
  1. Open the campaign details.  
  1. Review any available error information.  
  1. Correct the identified issue.  
  1. Re-run or recreate the campaign if required.  

  • Common Causes of Campaign Failure

  • Missing recipient information.
  • Invalid recipient email addresses.
  • Reward configuration errors.
  • Payment or funding issues.
  • Integration synchronization problems.

Tips

  • Review recipient data before campaign activation.
  • Verify reward configurations carefully.
  • Monitor campaign notifications and reporting.

Common Mistakes

  • Re-running a failed campaign without resolving the underlying issue.
  • Ignoring recipient data validation errors.
  • Overlooking funding or billing requirements.

Related Articles